
Database Basic
မိတ်ဆက်
ကျွန်တော် ရေးသားခဲ့သည့် Programming Basic စာအုပ်မှာ data သိမ်းသည့် အပိုင်းနဲ့ ပတ်သက်ပြီး ထည့်သွင်း ရေးသားလိုပေမယ့် database အပိုင်းကို နားလည်မှသာ အဆင်ပြေမယ် ၊ သဘောပေါက်လွယ်မယ် လို့ တွေးမိပါတယ်။ ဒါကြောင့် database သီးသန့် စာအုပ် ထပ်မံ ရေးသားခြင်းဖြစ်ပါသည်။ Database နဲ့ ပတ်သက်ပြီး လေ့လာ စရာတွေ အများကြီး ဖြစ်သလို database တစ်ခု နဲ့ တစ်ခု မတူညီခြင်း ကြောင့် အကုန်လုံး ပြီးပြည့်စုံအောင် ရေးဖို့ က မလွယ်ကူလှပါဘူး။ ဒီစာအုပ်မှာတော့ အခြေခံ အဆင့် ကို သာ ဖော်ပြပေးနိုင်ပါတယ်။ အခြေခံ အဆင့် အနေနဲ့ လူသုံးများသည့် MySQL ကိုသာ အခြေခံပြီး ရေးသားထားပါတယ်။
Chapter 1
Database ဆိုတာ
ကျွန်တော်တို့ တွေ Program တွေကို ရေးသည့်အခါမှာ data တွေကို သိမ်းဆည်းဖို့ လိုအပ်ပါတယ်။ Data တွေကို သိမ်းဆည်းသည့် အခါမှာတော့ File အနေဖြင့် သိမ်းဆည်းနိုင်ပါတယ်။ သို့ပေမယ့် Data တွေ များလာသည့် အခါမှာတော့ database ဖြင့် သိမ်းဆည်းမှ သာ အဆင်ပြေပါတယ်။
Database ကို အသုံးပြုခြင်းဖြင့် data တွေကို လွယ်ကူစွာ သိမ်းဆည်းနိုင်ခြင်း ၊ data အမြောက်အများ သိမ်းဆည်းနိုင်ခြင်း ၊ data များကို ပြန်လည် ရှာဖွေနိုင်ခြင်း တို့ ပြုလုပ်နိုင်ပါတယ်။
Database မှာ အမျိုးမျိုုး ရှိပါတယ်။ အများအသုံးများသည့် database တွေက တော့
- Relational Database
- NoSQL (Not Only SQL)
တို့ ဖြစ်ပါတယ်။
Relational Database မှာ Microsoft SQL, MySQL, Postgres, Oracle, SQLite စသည်တို့ ပါဝင်ပါတယ်။ Relational Database ဟာ table တွေပါဝင်ပြီးတော့ table တစ်ခု နှင့် တစ်ခု relationship ရှိနေသည့် သဘောပါ။ data တွေကို ဆွဲထုတ်သည့်အခါမှာ SQL ဆိုသည့် structure query language ကို အသုံးပြုပြီး ဆွဲထုတ်ရပါတယ်။ Database အမျိုးအစား ပေါ်မူတည်ပြီး SQL syntax ဟာ အနည်းအများ ပြောင်းလဲ မှုရှိပေမယ့် အခြေခံကတော့ အတူတူပါပဲ။
NoSQL မှာတော့ MongoDB, Redis, Neo4j စသည် တို့ ပါဝင်ပါသည်။ NoSQL မှာတော့ relation ချိတ်ဆက်မှုကို အဓိက မထားပါဘူး။ MongoDB ဟာ document ပုံစံအနေဖြင့် data သိမ်းဆည်းပြီး Redis ဟာ Key Value ပုံစံ ဖြင့် သိမ်းဆည်းပါတယ်။ Neo4j ကတော့ Graph ပုံစံ ဖြင့် data သိမ်းဆည်းပါတယ်။
အခုစာအုပ်မှာတော့ Relational Database ဖြစ်သည့် MySQL ကို အဓိက ထားပြီး ပြောသွားပါမယ်။ MySQL ကို အသုံးပြုဖို့ Realational database သဘောတရား ကို နားလည်ဖို့ လိုပါတယ်။ Database မှာ ပါဝင်သည့် အရာများ နောက်ပြီး SQL (Structured Query Language) ကို လေ့လာ ဖို့ လိုပါတယ်။
+++
Relational Database တွင် ပါဝင်ခြင်းများ
Database ကို ဖို့ အတွက် ပထမဆုံး Database ကို စတည် ဆောက်ဖို့ လိုပါတယ်။
Database မှာ Table တွေ တစ်ခု သို့မဟုတ် တစ်ခု ထက် မက ပါဝင်ပါတယ်။ Table ထဲမှာ တော့ Rows တွေပါဝင်ပါတယ်။ Rows ထဲမှာ Columns တွေပါဝင်ပါတယ်။
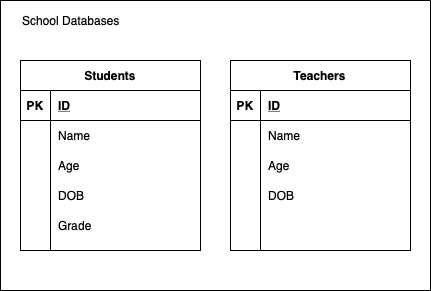
အထက်ပါ ပုံမှာ School Database ဖြစ်ပြီး School Database မှာ Students နှင့် Teachers table ပါပါတယ်။
Students Table မှာတော့ ID, Name, Age, DOB, Grade စတာတွေ ပါဝင်ပါတယ်။
Students table ထဲမှာတော့ Student data တွေက row by row ပါဝင်ပါလိမ့်မယ်။
Row ထဲက data တွေကို ထုတ်ဖို့ အတွက် SQL ကို သုံးပြီး ဆွဲထုတ်ရပါမယ်။
နောက် အခန်းက စပြီး MySQL စသွင်း ပါမယ်။
Chapter 2
MySQL Installation
အခု mysql ကို ဘယ်လို install လုပ်ရမလဲ ဆိုတာကို တဆင့်ခြင်း ဖော်ပြသွားပါမယ်။ ပထမဆုံး Windows ကို စတင်ပြီး တော့ ဖော်ပြသွားပါမယ်။
Windows
Windows မှာ mysql သွင်းဖို့ အတွက် https://www.mysql.com ကို ဖွင့်ပါ။ Page ၏ အောက်ဆုံးကို သွားပါ။ Download ဆိုတာ ရှိပါသည်။ MySQL Community Server ကို နှိပ်ပါ။

MSI Install ကို Download နှိပ်ပါ။

Installer ၂ ခုကို တွေ့ ရပါမည်။ Online ပေါ်မှ Download ချသည့် installer နှင့် offline install သွင်းလို့ရသည့် installer ဖြစ်ပါတယ်။ ဒုတိယ offline သွင်းလို့ ရသည့် installer ကို ရွေးပါ။

Login သို့မဟုတ် Sign Up ပေါ်လာလျှင် No thanks, just start my download ကို နှိပ်ပါ။

Download စလုပ်ပြီး ခဏ စောင့်ပါ။ MSI installer file download ချပြီးပါက ရရှိပါမည်။ Double click လုပ်ပြီး install လုပ်ပါ။

Alert box တက်လာခဲ့လျှင် YES ကို သာ နှိပ်ပေးပါ။

Installer တက်လာပါမည်။
Install လုပ်ဖို့ အတွက် Developer Default ကို ရွေးပါ။ Developer Default မှာ Install အများကြီး သွင်းဖို့ အဆင်မပြေရင် Custom ကနေ သွင်းနိုင်ပါတယ်။ Custom မှာ MySQL Server, MySQL Shell တို့ အဓိက လိုအပ်ပါသည်။ Connector , Excel စသည် တို့က မသွင်းလည်း ဖြစ်ပါသည်။ Programming နှင့် တွဲသုံးရန် Visual Studio Connector , C++ Connector စသည် တို့ ပါဝင်ပါသည်။ Python အတွက် Python Connector ပါဝင်ပါသည်။ Python 3.6 (64 bit) edition သွင်းရန် လိုအပ်ပါသည်။

တခါတလေ Python သွင်းထားပေမယ့် Connector မတွေ့တာ ဖြစ်တတ်ပါတယ်။ နောက်ပိုင်း manual ပြန်သွင်းနိုင်ပါသည်။
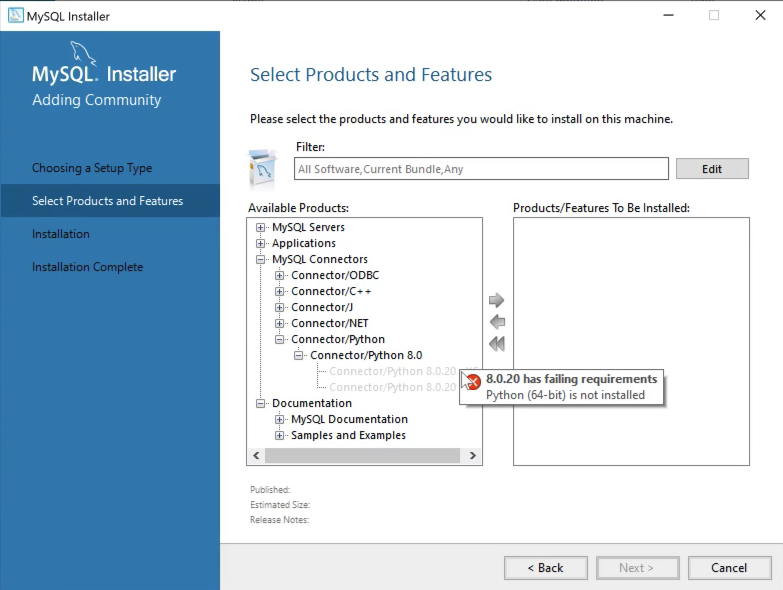
MySQL Connector သွင်းမရတာ နောက်ပြီး လိုအပ်တာတွေ ပြပေးပါလိမ့်မယ်။

Connector တွေက နောက်ပိုင်းမှာ ပြန်သွင်းနိုင်ပါတယ်။
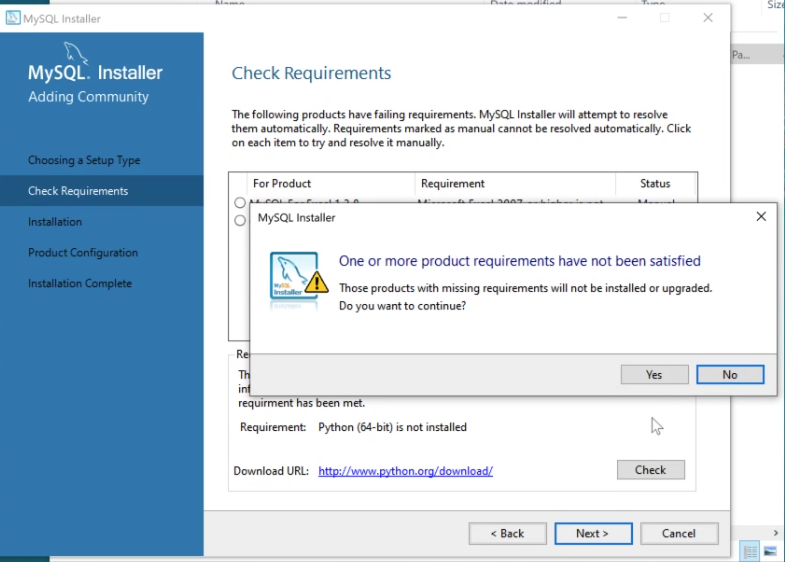
အထက်ပါ အတိုင်း ပေါ်လာလျှင် Yes ကို နှိပ်ပါ။
MySQL မှာ သွင်းမည့် List ပေါ်လာပါမည်။ Execute နှိပ်ပြီး Install ပြီးအောင် စောင့်ရန် လိုအပ်ပါသည်။
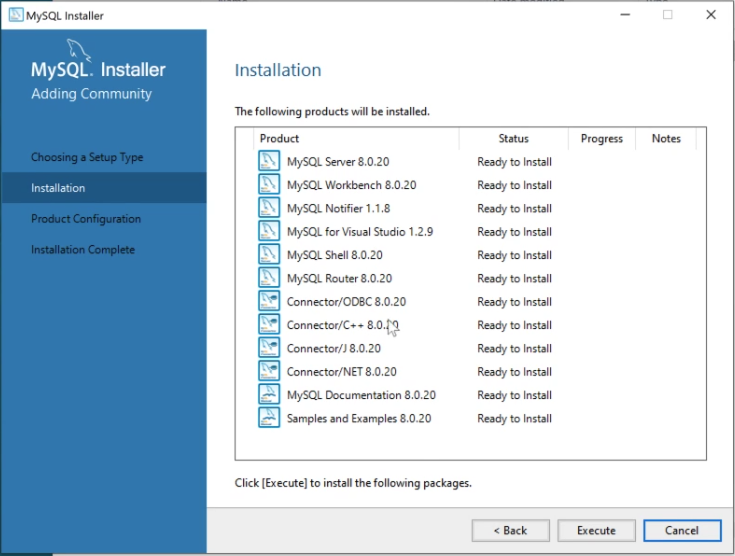
ခဏနေရင် Install သွင်းတာ ပြီးသွားပါမည်။

အခု စပြီး configuration လုပ်ပါမည်။ MySQL Server , MySQL Router, Samples and Example ဆိုပြီး ၃ ခု ကို configure လုပ်ရပါမည်။


High Availability အတွက် Standalone MySQL Server/Classic MySQL Replication ကို ပဲ ရွေးချယ်ရန် လိုအပ်ပါသည်။ InnoDB Cluster ကို တကယ် production ပြုလုပ်သည့် အခါ system အကြီးကြီးတွေ ဖန်တီးသည့် အခါမှသာ အသုံးပြုကြပါတယ်။

ဘာမှ ပြင်ရန် မလိုပါဘူး။ Next ကို နှိပ်ပါ။

Strong Password Encryption for Authentication ကို ရွေးချယ်ထားရန် လိုအပ်ပါသည်။
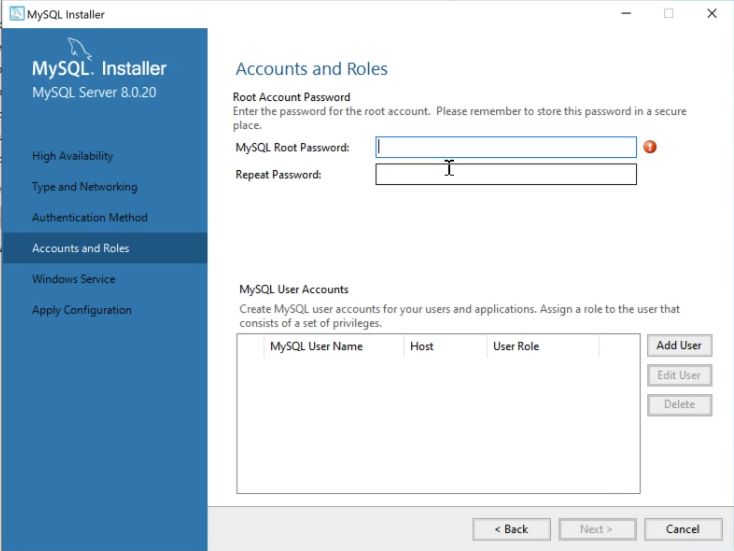
MySQL ၏ root password ကို ထည့်သွင်းရန် လိုအပ်ပါသည်။ Root password နှင့် repeat password ကို ထည့်ပြီးပါက Next ကို နှိပ်ပါ။

ပြင်စရာ မရှိပါဘူး။ Next ကို နှိပ်ပါ။
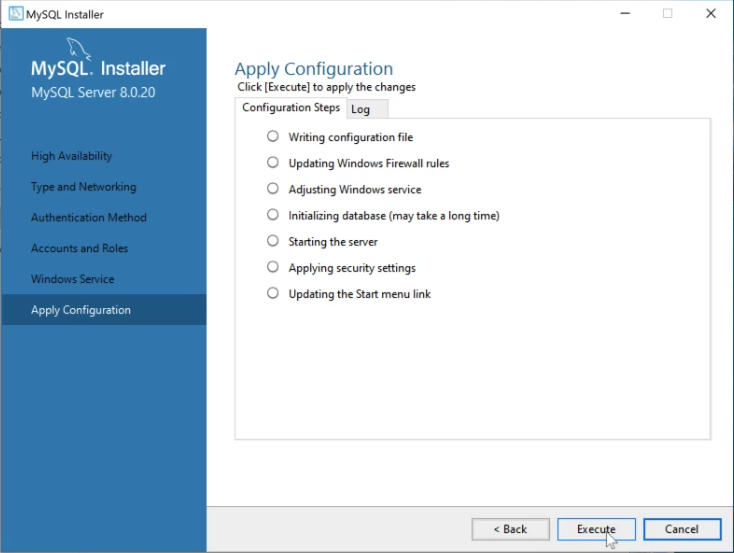
Execute လုပ်လျှင် ရပါပြီ။
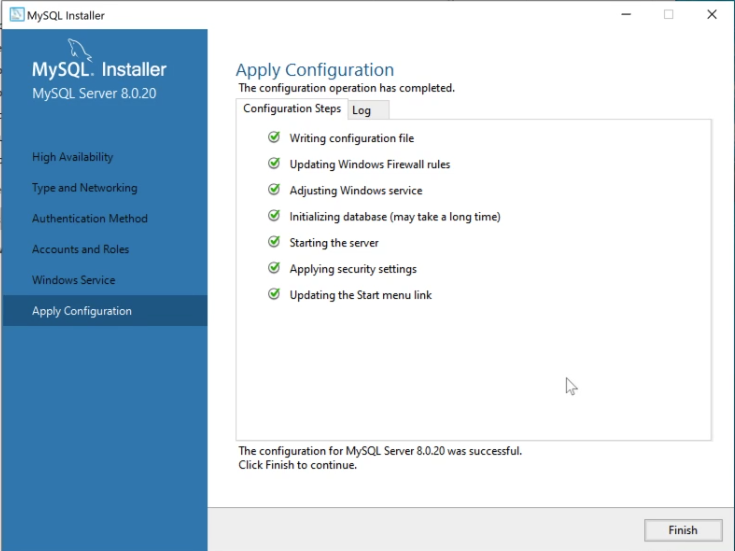
ပြီးသွားလျှင် Finish ကို နှိပ်ပါ။

MySQL Router Configuration မှာလည်း ပြင်ဖို့ မလိုပါဘူး။ Finish ကို နှိပ်ပါ။
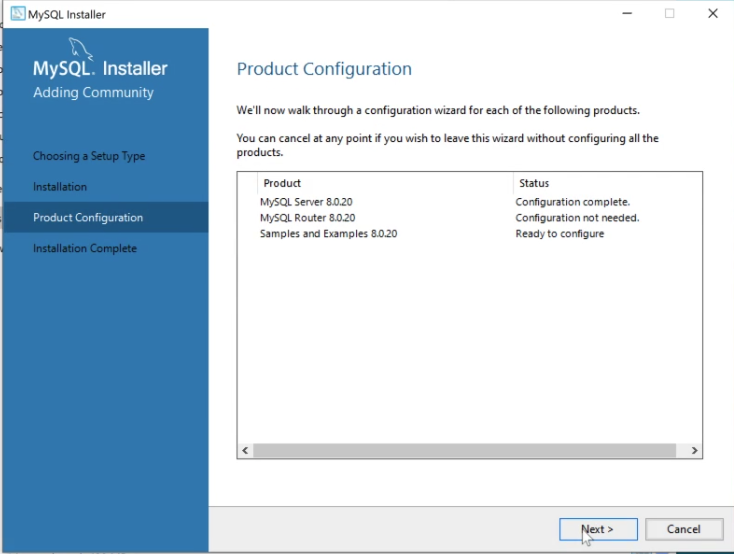
နောက်ဆုံး Config လုပ်ဖို့ အတွက် Next ကို နှိပ်ပါ။

root အတွက် password ထည့်ပြီး Check ကို နှိပ်ပါ။ ပြီးလျှင် Next နှိပ်ပါ။
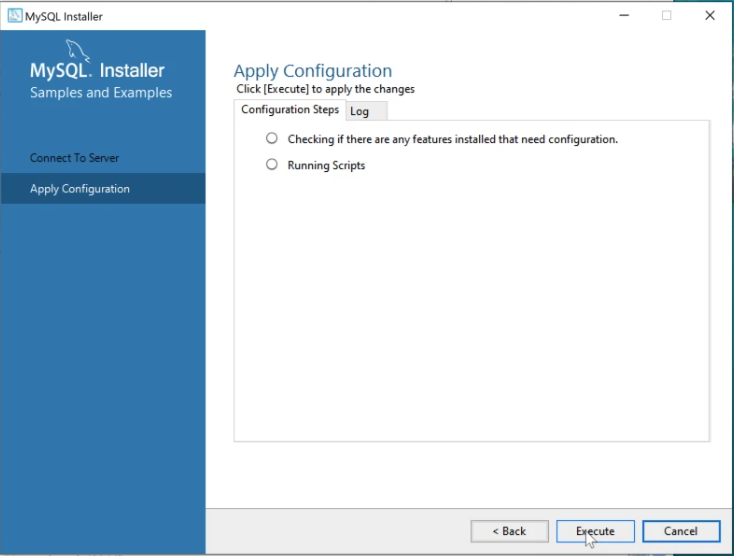
Execute လုပ်ပါ။

Finish လုပ်ပြီး MySQL သွင်းတာ ပြီးပါပြီ။


Start MySQL Workbench after Setup နဲ့ Start MySQL Shell After Setup ကို uncheck လုပ်ထားပါ။ လုပ်ထားခဲ့လျှင် Application ၂ ခု Finish လုပ်ပြီး လျှင် ပွင့်လာသည် ကို တွေ့နိုင်မှာပါ။
Start Menu ကနေ MySQL Command Line Client ကို သွားပါ။ Root password ကို ထည့်ပါ။
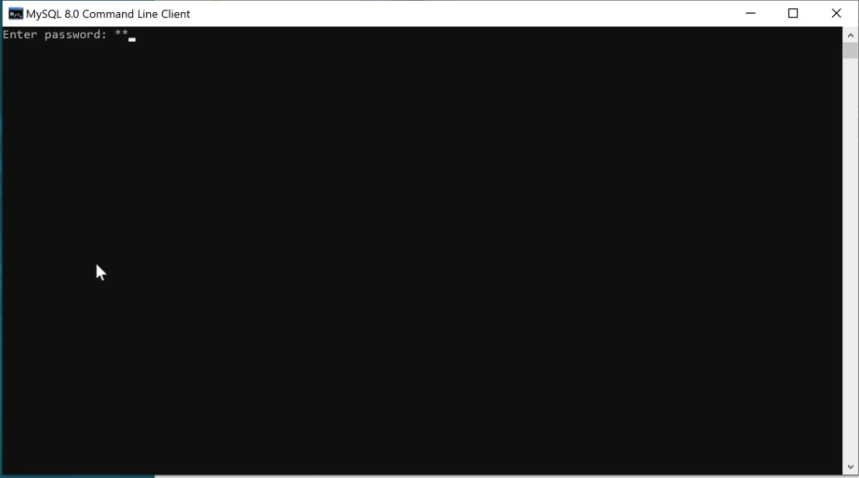

SQL command line ဖြစ်သည့် show databases; ကို ရိုက်လိုက်လျှင် database စာရင်း မြင်ရပါလိမ့်မည်။

+++
Linux (Ubuntu)

Linux မှာ သွင်းဖွင့် ပထမ ဆုံး terminal ကို ဖွင့်ပါ။ ပြီးလျှင်
sudo apt update
ဖြင့် နောက်ဆုံး update repo ရအောင် run ခြင်းဖြစ်ပါသည်။


sudo apt install mysql-server
ရိုက်ထည့်ပြီးတော့ mysql server ကို သွင်းပါ။

ပြီးလျှင် secure install လုပ်ပါမည်။
sudo mysql_secure_installation
ဆိုပြီး ရိုက်ထည့်ပါ။

password level မှာ ၃ ခု ရှိပါတယ်။ development အတွက်ပဲ ဆိုရင်တော့ LOW ဖြစ်သည့် 0 ကို ရိုက်ထည့်ပါ။

Remove anonymous users ဆိုလျှင် y ကို ရိုက်ထည့်ပါ။

Remove test database ဆိုလျှင် y ကို ရွေးပါ။

Disallow root login remotely ဆိုလျှင် y ကို ရွေးပါ။

ပြီးလျှင် New Password , Re-enter new password တို့ ထည့်ပါ။ ၂ ခု ဟာ တူညီ ရပါမည်။ အနည်းဆုံး စာလုံး အရေအတွက် ၈ လုံး ရှိရပါမည်။

Reload privilege ကို y ပြန်ပေးပါ။
ပြီးသွားလျှင် mysql ကို ဝင်လို့ ရပါလိမ့်မယ်။ mysql ဝင်ရန်
mysql -uroot
ဖြင့် ဝင်ကြည့်ပါ။ ဝင် လို့ ရခဲ့ရင် mysql သွင်းတာ အဆင်ပြေပါပြီ။ root အတွက် password ထည့်ပါမည်။
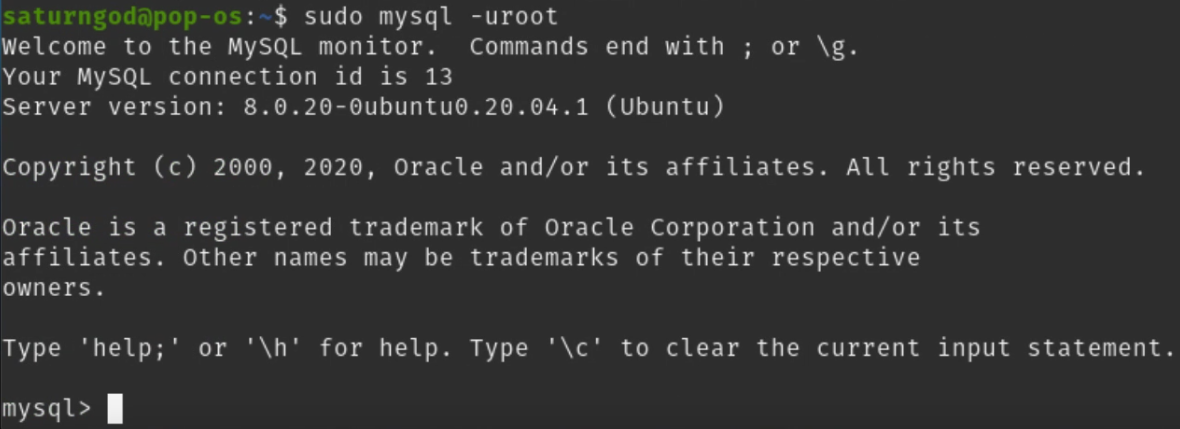

select user,authentication_string,plugin,host from mysql.user;
ဆိုပြီး ရိုက်ထည့်ပါ။
root ၏ plugin က auth_socket ဖြစ်နေတာကို တွေ့ရပါမယ်။ mysql run နေသည့် server မှာ root က password မလိုပဲ run ခွင့်ပေးထားတာပါ။ ကျွန်တော် တို့ root password ကို မဖြစ်မနေထည့်ဖို့ အတွက် plugin ကို caching_sha2_password ပြောင်းရပါမယ်။

ALTER USER 'root'@'localhost' IDENTIFIED WITH caching_sha2_password BY 'YOUR PASSWORD HERE'
YOUR PASSWORD HERE ဆိုသည့် နေရာမှာ ကိုယ် အသုံးပြုချင်သည့် root password ထည့်ပါ။

FLUSH PRIVILEGES;
ပြီးလျှင် FLUSH PRIVILEGES လုပ်ပါ။
select user,authentication_string,plugin,host from mysql.user;
run ကြည့်လိုက်ရင် root က caching_sha2_password ဖြစ်သွားတာကို တွေ့ပါမည်။


\q
ဆိုတာ ရိုက်ထည့်ပြီး ထွက်လိုက်ပါ။

sudo mysql -uroot -p
ကို ရိုက်ထည့်ရင် password တောင်းပါမည်။ root password ထည့်ပြီး ဝင်နိုင်ပါပြီ။
+++
Mac
Mac အတွက် http://www.mysql.com ကို သွားပါ။ အောက်ဆုံးမှာ Download s > MySQL Community Server ကို နှိပ်ပါ။

Operation System မှာ macOS ကို ရွေးပါ။ ပြီးလျှင် DMG Archive ကို Download လုပ်ပါ။

Account login ဝင်ဖို့ လိုသည့် နေရာ အတွက် No thanks,just start my download ကို ရွေးပါ။

Do you want to allow download ဆိုလျှင် Allow ကို ရွေးပါ။
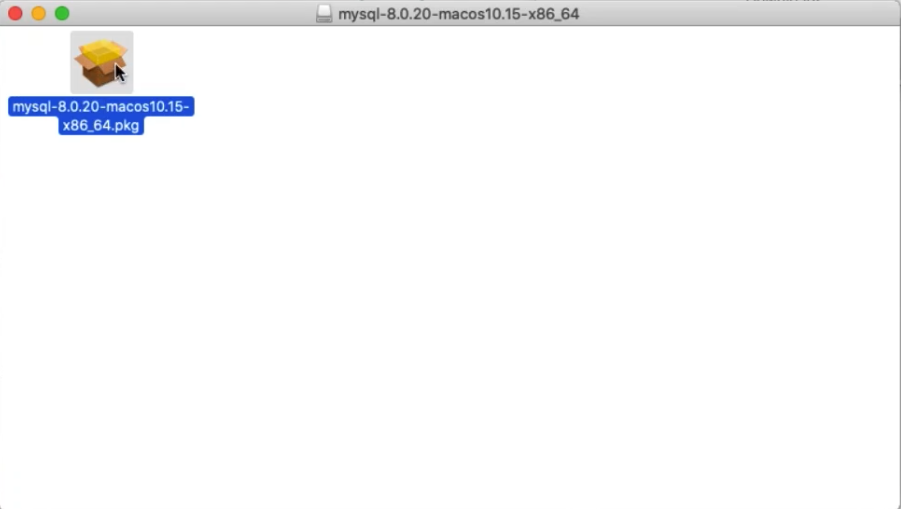
DMG ကို ဖွင့်လျှင် pkg တက်လာပါမည်။ pkg file ကို double click လုပ်ပြီး install စသွင်းပါမည်။
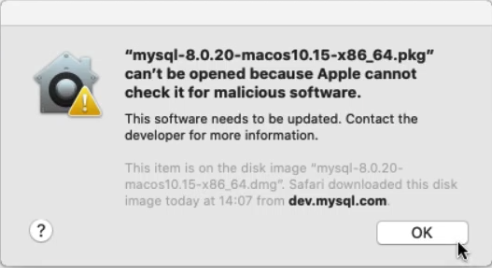
အကယ်၍ အထက်ပါ screen အတိုင်း တက်လာခဲ့လျှင် System Preference အောက်က Security & Privacy ကို ရွေးပါ။

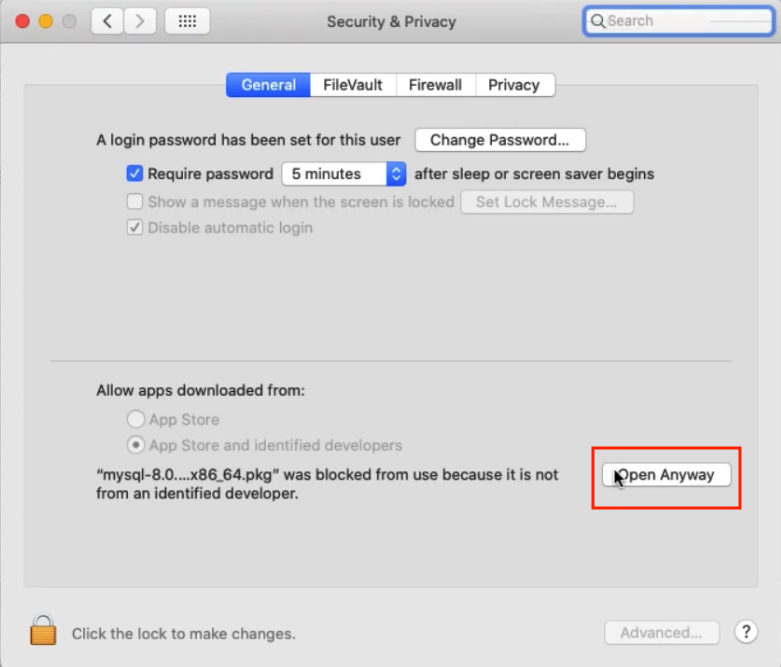
Open Anyway ကို ရွေးပါ။

Open ကို ရွေးပါ။
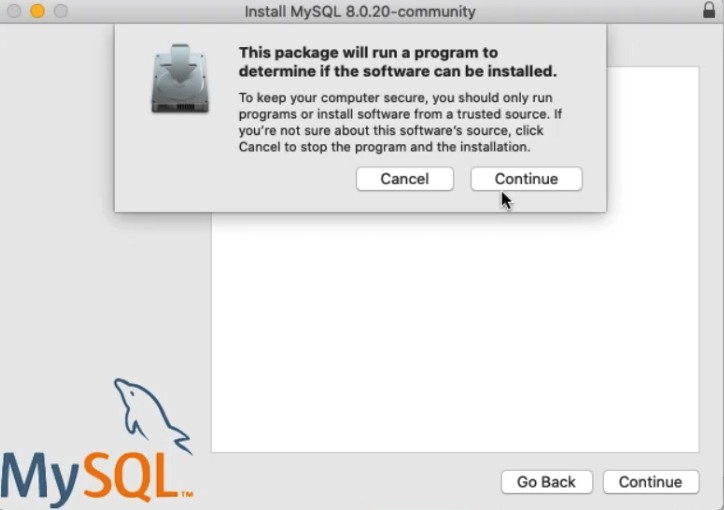
Continue ကို နှိပ်ပါ။

Install ကို နှိပ်ပါ။

စက်၏ Root password ကို ထည့်ပါ။
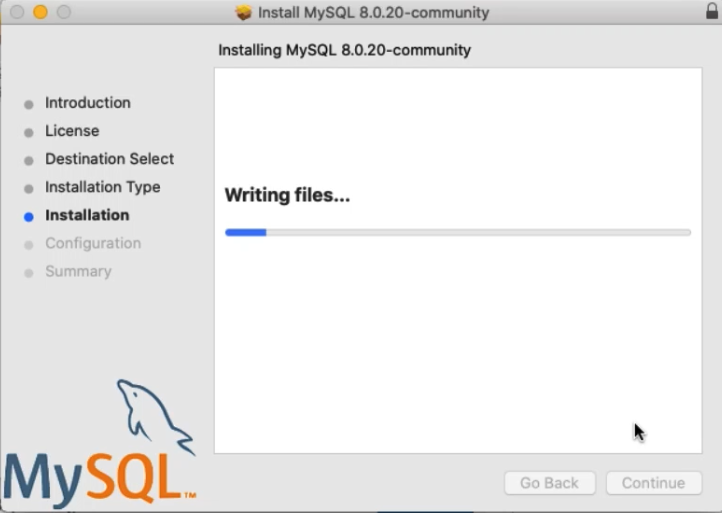
Install သွင်းဖို့ ခဏ စောင့်ရပါမယ်။
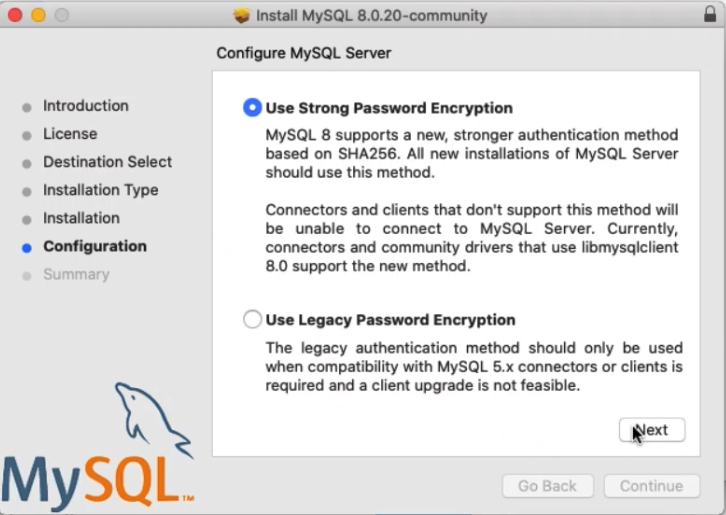
Install ပြီးလျှင် mysql root password ထည့်ဖို့ အတွက် Strong password ကို ရွေးပါ။
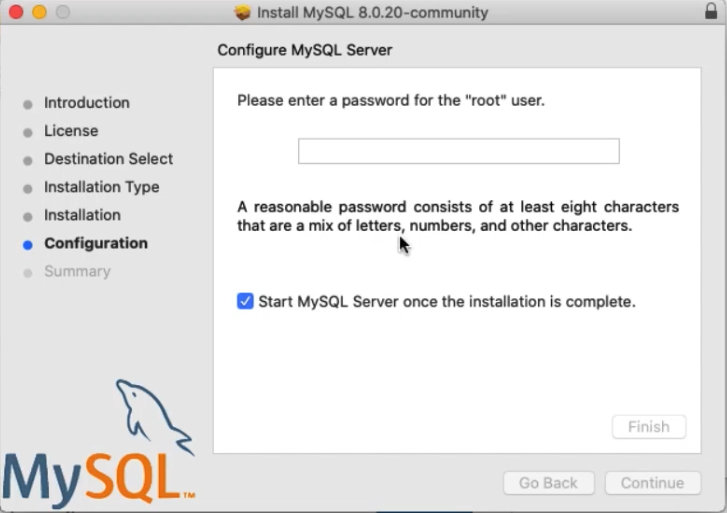

Root password ထည့်ပါ။
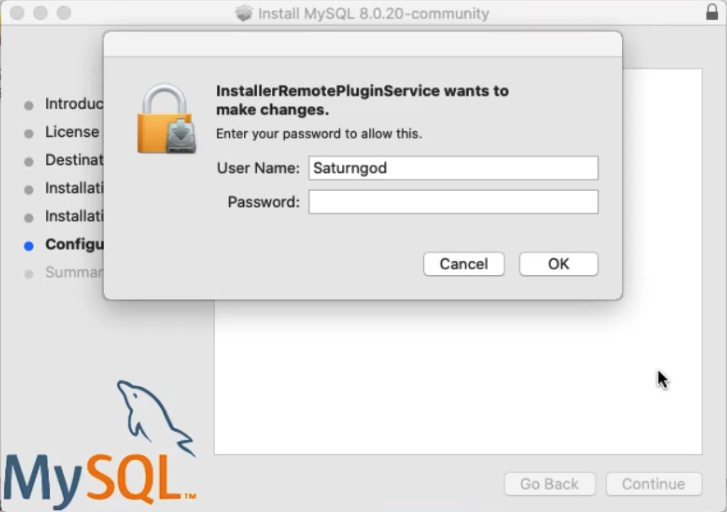
စက်ရဲ့ root password ကို ထည့်ပါ။

Install ပြီးလျှင် close နှိပ်ပါ။

System Preference ကို သွားပါ။ MySQL ဆိုတာ ပေါ်လာတာကို တွေ့ရပါမယ်။

MySQL ထဲကို ဝင်လျှင် MySQL run နေသည်ကို တွေ့ရပါမယ်။ အကယ်၍ mysql မ run လျှင် start mysql server ကို နှိပ်ပါ။

Configuration ကို သွားပါ။ MySQL သွင်းထားသည့် လမ်းကြောင်းကို တွေ့ရပါမည်။
App မှ Terminal ကို သွားပါ။

MySQL သွင်းသည့် ပတ်လမ်းကြောင်း ဖြစ်သည့် /usr/local/mysql ကို သွားပါမည်။ Terminal တွင်
cd /usr/local/mysql
ဆိုပြီး သွားပါ။
cd bin
ဆိုပြီး ထပ်သွားပါ။
ls
ရိုက်ထည့်လျှင် folder မှာ ရှိသည့် file များ ကို ဖော်ပြပါမည်။ mysql ရှိသည် ကို တွေ့ရပါမည်။

mysql -uroot -p
Password တောင်းလျှင် mysql install သွင်းခဲ့သည့် အချိန်က root password ကို ထည့်ရန် လိုအပ်သည်။ mysql ထဲ ရောက်သွားသည် ကို တွေ့နိုင်ပါသည်။

\q
ဖြင့် mysql မှ ထွက်ရန် လိုအပ်ပါသည်။

touh ~/.zhrc
ဆိုပြီး terminal မှာ ရေးပါ။ zshell အတွက် mysql path ထည့်ရန် ဖြစ်သည်။

open ~/.zshrc

export PATH=/usr/local/mysql/bin:$PATH
လို့ ထည့်ပြီး save လုပ်လိုက်ပါ။
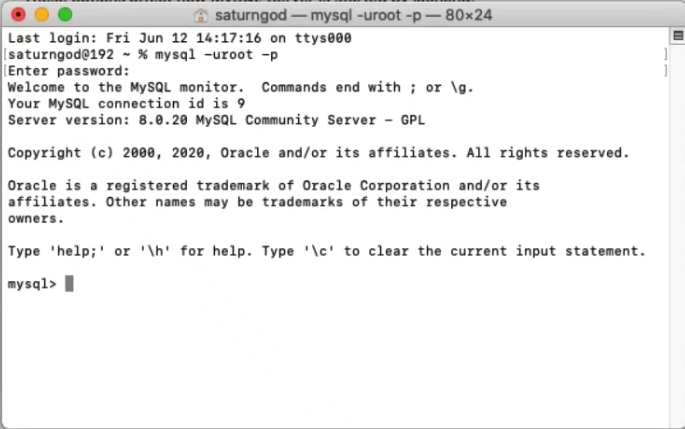
Terminal မှာ
mysql -uroot -p
လို့ရိုက်ပါ။ password ထည့်ပြီး mysql ဝင်လို့ ရပါပြီ။
Chapter 3
စတင်ခြင်း
Database ထဲက data ကို ဆွဲမထုတ်ခင်မှာ MySQL မှာ database ဦးစွာ ဆောက်ဖို့ လိုပါတယ်။
MySQL ကို ဖွင့်ပါ။ Terminal သို့မဟုတ် command line မှာ
mysql -uroot -p
Password တောင်းပါလိမ့်မယ်။ MySQL မှာ သုံးထားသည့် root password နဲ့ ဝင်လိုက်ပါ။
Create Database
create database school;
ဆိုပြီး ရိုက်ပါ။ ဒါဆိုရင် school database ဆောက်ပြီးပါပြီ။
show databases;
ဆိုရင် လက်ရှိ ဆောက်ထားသည့် table တွေကို ဖော်ပြပေးပါလိမ့်မယ်။ ကျွန်တော်တို့ school database ကို သုံးမှာ ဖြစ်သည့် အတွက်
use school;
ဆိုပြီး school database သုံးဖို့ ရွေးလိုက်ပါမယ်။
Create Table
create table students (
id int auto_increment primary key,
name varchar(255) not null,
join_date DATE,
bio Text,
room_id int,
created_at timestamp default current_timestamp);
အခု ဆိုရင် student table တစ်ခု တည်ဆောက်သွားပါလိမ့်မယ်။ အထက်ပါ code ကို ရှင်းပြပါမယ်။
SQL မှာ create table ဆိုတာကတော့ Table တစ်ခု တည်ဆောက်တာပါ။
ပြီးလျှင် [column name] [data type] [option], ဆိုပြီး လာပါတယ်။
id int auto_increment primary key,
ဆိုတာကတော့ column name က id ဖြစ်ပြီးတော့ int data type ပါ။ auto_increment ဆိုတာကတော့ အလိုအလျောက် နံပတ် ထည့်သွားမယ် လို့ ပြောထားတာပါ။ primary key ဆိုတာကတော့ PRIMARY Key ဖြစ်ကြောင်း ကြေငြာထားတာပါ။
name varchar(255) not null,
not null ဆိုတာကတော့ NULL ဖြစ်ခွင့်မရှိဘူး။ data ထည့်သည့် အခါမှာ information တစ်ခုခု ဖြည့်ဖို့ လိုတယ် လို့ ကြေငြာထားတာပါ။
created_at timestamp default current_timestamp
timestamp ကတော့ timestamp value ဖြစ်ပါတယ်။ default ကတော့ ဘာ data မှ မထည့်ခဲ့လျှင် default နောက်မှ ရေးထားသည့် value ကို ထည့်မယ်။ default current_timestamp လို့ ရေးထားသည့် အတွက်ကြောင့် current timestamp ကို ထည့်သွားမယ်လို့ ဆိုပါတယ်။
describe students;
ဆိုပြီး ရေးလိုက်ရင်် students table မှာ ပါသည့် columns တွေကို တွေ့ရပါမည်။
PRIMARY KEY
PRIMARY KEY ဆိုတာကတော့ table တစ်ခု တည်ဆောက်တိုင်း အမြဲထည့်သွင်းဖို့ လိုပါတယ်။ PRIMARY KEY က မထပ်ရဘူး။ Studen ID လိုပါပဲ။ တကျောင်းလုံးမှာ Studen ID 1 က တစ်ယောက်ပဲ ရှိပါတယ်။ နောက်ပြီး Customer ID လိုပါပဲ။ Customer စာရင်းကို မှတ်ရင် Customer ID 1 က နောက်တစ်ယောက် ထပ်မရှိပါဘူး။ အခု Students table မှာ row တစ်ကြောင်းထည့်လိုက်ရင် id က 1 နဲ့ ဝင်သွားမယ်။ နောက်တစ်ကြောင်း ထပ်ဖြည့်ရင် 2 နဲ့ ဝင်ပါမယ်။ အလိုလို ၁ တိုးသွားမယ်။ auto_increment ထည့်ထားသည့် အတွက် အလိုလို ၁ တိုးသွားတာပါ။
Data Type
SQL မှာ ပါသည့် Data type တွေကို အောက်မှာ ဖော်ပြထားပါတယ်။
| Data Type | Spec | Data Type | Spec |
|---|---|---|---|
| CHAR | String (0-255) | INT | Integer (-2147483648 to 2147483647) |
| VARCHAR | String (0-255) | BIGINT | Big Integer (-9223372036854775808 to 9223372036854775807) |
| TINYTEXT | String (0-255) | FLOAT | Decimal (precise to 23 digits) |
| TEXT | String (0-65535) | DOUBLE | Decimal (24 to 53 digits) |
| BLOB | String (0-65535) | DECIMAL | "DOUBLE" store as String |
| MEDIUMTEXT | String (0-16777215) | DATE | YYYY-MM-DD |
| MEDIUMBLOB | String (0-16777215) | DATETIME | YYYY-MM-DD HH:MM:SS |
| LONGTEXT | String (0-4294967295) | TIMESTAMP | YYYYMMDDHHMMSS |
| LONGBLOB | String (0-4294967295) | TIME | HH:MM:SS |
| TINYINT | String (-128 to 127) | ENUM | One of preset options |
| SMALLINT | Integer (0-4294967295) | SET | Selection of preset options |
| MEDIUMINT | Integer (-8388608 to 8388607) | BOOLEAN | TINYINT(1) |
အထက်ပါ data type တွေက လိုအပ်သလို အသုံးပြုနိုင်ပါတယ်။ သတိပြုရမှာကတော့ size ကြီးလေလေ storage များလေလေပါပဲ။ နောက်ပိုင်း search နဲ့ ပတ်သက်ပြီး index ထောက်ရာမှာလည်း size သေးလေလေ ပို အဆင်ပြေလေလေ ပါပဲ။ စာလုံး အရေအတွက် က 255 ထက် မကျော်နိုင်လျှင် varchar ကို သုံးတာ ပို အဆင်ပြေပါမယ်။
Data type ထဲမှာ BLOB ဆိုတာကတော့ Binary data တွေ သိမ်းဖို့ပါ။
Insert Row
ကျွန်တော်တို့တွေ students table ထဲကို row တစ်ကြောင်းထည့်ပါမယ်။
INSERT INTO students (name,join_date,bio,room_id)
VALUES ("Saturngod","2020-06-19","Student to learn SQL",221);
အခု ဆိုရင် row တစ်ကြောင်းထည့်သွင်းပြီးပါပြီ။
Row ကို ထည့်ချင်ရင်တော့
INSERT INTO [table name] ([COLUMN],[COLUMN],[COLUMN])
VALUES ([VALUE],[VALUE],[VALUE]);
ဆိုပြီး ထည့်ရပါမယ်။ Columns က တစ်ခု သို့မဟုတ် တစ်ခု ထက်မက ဖြစ်နိုင်ပါတယ်။ VALUES မှာ ထည့်ရမည့် value က အရှေ့က column order နဲ့ ညီမှ ရပါမယ်။
Retrieve Row
အခု database ထဲက ထည့်ထားသည့် value ကို ထုတ်ကြည့်ရအောင်။
SELECT * FROM students;
ထည့်ထားသည့် data တွေ ထွက်လာပါမယ်။ Row တစ်ကြောင်းတည်း ဆိုရင် တစ်ကြောင်းပဲ ထွက်လာပါမယ်။
+----+-----------+------------+----------------------+---------+---------------------+
| id | name   | join_date  | bio     | room_id | created_at |
+----+-----------+------------+----------------------+---------+---------------------+
|  1 | Saturngod | 2020-06-19 | Student to learn SQL | 221 | 2020-06-22 01:17:59 |
+----+-----------+------------+----------------------+---------+---------------------+
1 row in set (0.000 sec)
အခု ဆိုရင်တော့ create database , create table, insert row , retrieve data တို့ ကို လေ့လာပြီးပါပြီ။
Chapter 4
SELECT
Import Data
ပထမဆုံး select အကြောင်း စတင်ဖို့ အတွက် အရင်ဆုံး data တွေ ထည့်သွင်းပါမယ်။ https://bit.ly/sampledbbasic (Sample Data) ကို ဦးစွာ download ချပါ။ Unzip ဖြည်ပါ။ mysqlsampledatabase.sql file ရပါလိမ့်မယ်။
Terminal ဖွင့်ပါ။
$ mysql -uroot -p < ~/Download/mysqlsampledatabase.sql
mysqlsampledatabase.sql ကို download folder အောက်မှာ ထည့်ထားသည့် အတွက် အထက်ပါ ပုံစံ အတိုင်း ရေးသားထားပါသည်။ .sql ပတ်လမ်းကြောင်း အပြည့်အစုံ ထည့်ပေးဖို့ လိုပါတယ်။
$ mysql -uroot -p
ဖြင့် mysql ကို ဝင်လိုက်ပါ။
show databases;
ဆိုရင် classicmodels ကို တွေ့ပါမယ်။
use calssicmodels;
ဆိုပြီး database ကို classicmodels select လုပ်လိုက်ပါမယ်။
show tables;
ဆိုရင် tables တွေ အကုန် ပြပါလိမ့်မယ်။
+-------------------------+
| Tables_in_classicmodels |
+-------------------------+
| customers               |
| employees               |
| offices                 |
| orderdetails            |
| orders                  |
| payments                |
| productlines            |
| products                |
+-------------------------+
Select From Table
SELECT ဆိုတာကတော့ Table ထဲက data တွေ ဆွဲထုတ်ဖို့ အတွက်ပါ။
Select syntax ကတော့
SELECT [column],[column] FROM [table]
ဥပမာ
SELECT customerNumber,customerName FROM customers;
အကယ်၍ column အကုန်လုံးပါစေချင်ရင်တော့ * ကို အသုံးပြုနိုင်ပါတယ်။
SELECT * FROM customers;
Limit
အခု data တွေကို ထုတ်ကြည့်သည့် အခါမှာ Data တွေ အများကြီး ထွက်လာတာကို တွေ့ရပါမယ်။ ကျွန်တော်တို့ data ကို လိုသလောက် ပဲ ထုတ်ချင်ရတော့ limit ကို သုံးရပါမယ်။
SELECT * FROM customers LIMIT 10
ဒါဆိုရင် ပထမဆုံး ၁၀ ကြောင်းပဲ ထွက်လာပါမယ်။ LIMIT က
LIMIT [OFFSET],[COUNT]
ဆိုပြီး ရှိပါတယ်။
ဥပမာ
Page 1 အတွက်
SELECT * FROM customers LIMIT 0, 10
offset 0 က စမယ်လို့ ဆိုပါတယ်။
Page 2 ကို သွားမယ်ဆိုရင်တော့
SELECT * FROM customers LIMIT 10 , 10
Page 3 ကို သွားမယ်ဆိုရင်တော့
SELECT * FROM customers LIMIT 20 , 10
Page by Page သွားချင်ရင်
LIMIT [(page - 1) * number of row per page] , [number of row per page]
ဆိုသည့် formula နဲ့ သွားနိုင်ပါတယ်။ သတိထားသင့်တာကတော့ data တွေဟာ သန်းနဲ့ ချီလာသည့် အခါမှာ Page များလာလေလေ data ထုတ်ရတာ ကြာလေလေဖြစ်တတ်ပါတယ်။
OREDER BY
ကျွန်တော်တို့ data တွေကို ထုတ်သည့် အခါမှာတော့ ကြီးစဥ် ငယ်လိုက် စီမလား ငယ်စဥ် ကြီးလိုက် စီမလား ဆိုပြီး ထုတ်ကြည့်လို့ရပါတယ်။ အဲဒီ အတွက် ORDER BY ကို အသုံးပြုနိုင်ပါတယ်။
SELECT * FROM TABLE ORDER BY [Column] [ASC|DESC]
Order စီသည့် အခါမှာတော့ ascending နှင့် descending ဆိုပြီး ရှိပါတယ်။ အငယ်ကို စ စေချင်ရင်တော့ asc ကို သုံးပြီး အကြီးကို စမယ် ဆိုရင်တော့ desc ကို သုံးပါတယ်။
SELECT * FROM customers ORDER BY customerName DESC;
ဒါဆိုရင်တော့ customerName ကို ကြီးစဥ် ငယ်လိုက် စီပြီး ပြပေးပါမယ်။
SELECT * FROM customers ORDER BY customerName ASC;
ဒါဆိုရင်တော့ ငယ်စဥ်ကြီးလိုက် ပြပေးပါမယ်။
SELECT * FROM customers ORDER BY customerName ASC LIMIT 10;
LIMIT ကိုတော့ နောက်ဆုံးမှာပဲ ထည့်ပြီး သုံးရပါတယ်။ customerName ငယ်စဥ်ကြီးလိုက် ပြပေးပြီး ထိပ်ဆုံး ၁၀ ခု ပဲ ပြမယ် ဆိုသည့် သဘောပါ။
WHERE
ထပ်ပြီးတော့ လိုချင်သည့် Data ကို ပဲ ဆွဲထုတ်ဖို့ အတွက် WHERE ကို အသုံးပြုနိုင်ပါတယ်။
SELECT customerNumber,customerName,phone FROM customers WHERE customerNumber = 169;
ဒါဆိုရင် customerNumber 169 ဖြစ်သည့် data ထွက်လာပါမယ်။
SELECT customerNumber,customerName,phone FROM customers WHERE customerNumber > 169;
ဒါဆိုရင်တော့ customerNumber 169 ထက်ကြီးတာ တွေ ထွက်လာပါမယ်။
SELECT customerNumber,customerName,phone FROM customers WHERE customerNumber < 169;
ဒါဆိုရင်တော့ customerNumber 169 ထက် ငယ်သည့် စာရင်း ထွက်လာပါမယ်။
SELECT customerNumber,customerName,phone FROM customers WHERE customerNumber > 169 and customerNumber < 205;
ဒါဆိုရင်တော့ customerNumber 169 ထက် ကြီးပြီး 205 ထက် ငယ်သည့် စာရင်း ထွက်လာပါမယ်။
SELECT customerNumber,customerName,phone FROM customers WHERE (customerNumber >= 169 and customerNumber <= 205) or (customerNumber >= 211 and customerNumber <= 227);
ဒါဆိုရင်တော့ >= သုံးထားသည့် အတွက် ကြောင့် တူမယ် ကြီးလည်း ကြီးမယ် လို့ ပြောထားပါတယ်။ <= သုံးထားသည့် အတွက် ကြောင့် တူမယ် ငယ်မယ် လို့ ပြောထားပါတယ်။ အထက်ပါ sql အရ ဆိုရင်တော့ 169 နှင့် တူမယ် 169 ထက်ကြီးမယ် ။ နောက်ပြီး 205 နှင့် တူမယ် 205 ထက် ငယ် ရမယ်။ အဲဒါက တစ်ခု။ ဒါမဟုတ် or ဆိုပြီး ထည့်ထားတာ တွေ့နိုင်ပါတယ်။ 211 နှင့် တူမယ် 211 ထက်ကြီးရင်မယ် ။ နောက်ပြီး 227 နှင့် တူမယ် 227 ထက် ငယ် ရမယ်။
and , or , () တွေကတော့ programming အခြေခံ သိသည့် သူတွေ အတွက် သိပြီးသား ဖြစ်မှာပါ။
အထက်ပါ SQL အရဆိုရင်တော့ result က
+----------------+--------------------------------+------------------+
| customerNumber | customerName                   | phone            |
+----------------+--------------------------------+------------------+
|            169 | Porto Imports Co.              | (1) 356-5555     |
|            171 | Daedalus Designs Imports       | 20.16.1555       |
|            172 | La Corne D'abondance, Co.      | (1) 42.34.2555   |
|            173 | Cambridge Collectables Co.     | 6175555555       |
|            175 | Gift Depot Inc.                | 2035552570       |
|            177 | Osaka Souveniers Co.           | +81 06 6342 5555 |
|            181 | Vitachrome Inc.                | 2125551500       |
|            186 | Toys of Finland, Co.           | 90-224 8555      |
|            187 | AV Stores, Co.                 | (171) 555-1555   |
|            189 | Clover Collections, Co.        | +353 1862 1555   |
|            198 | Auto-Moto Classics Inc.        | 6175558428       |
|            201 | UK Collectables, Ltd.          | (171) 555-2282   |
|            202 | Canadian Gift Exchange Network | (604) 555-3392   |
|            204 | Online Mini Collectables       | 6175557555       |
|            205 | Toys4GrownUps.com              | 6265557265       |
|            211 | King Kong Collectables, Co.    | +852 2251 1555   |
|            216 | Enaco Distributors             | (93) 203 4555    |
|            219 | Boards & Toys Co.              | 3105552373       |
|            223 | Natürlich Autos                | 0372-555188      |
|            227 | Heintze Collectables           | 86 21 3555       |
+----------------+--------------------------------+------------------+
20 rows in set (0.001 sec)
ဆိုပြီး ထွက်လာပါမယ်။
အခု customer name ကို ရှာကြည့်ရ အောင်။ customerName က text ဖြစ်သည့် အတွက်ကြောင့် nubmer လို > , < တွေ သုံးလို့ အဆင်မပြေပါဘူး။
Text တွေကို ရှာချင်သည့် အခါမှာတော့ Like ကို အသုံးပြုနိုင်ပါတယ်။
SELECT * FROM customers WHERE customerName LIKE 'Gif%';
Gif% ဆိုတာကတော့ Gif နဲ့ စမယ် နောက်မှာ အကုန်ဖြစ်နိုင်တယ် လို့ ဆိုလိုပါတယ်။
%Gif ဆိုရင်တော့ ကြိုက်တာလာမယ် နောက်ဆုံးမှာ Gif နဲ့ ဆုံးမယ် ဆိုလိုတာပါ။
%Gif% ဆိုရင်တော့ Gif စာလုံး အလယ်မှာ ပါမယ် ရှေ့မှာလည်း ဖြစ်နိုင်သလို နောက်မှာလည်း ဖြစ်နိုင်ပါတယ် လို့ ဆိုလိုတာပါ။
ကျွန်တော်တို့တွေ ရှေ့မှာ ဖတ်ထားသည့် SQL Syntax နဲ့ ပြောင်းပြီး အောက်က SQL ကြည့်ရအောင်။
SELECT customerNumber,customerName,phone FROM customers WHERE (customerNumber >= 169 and customerNumber <= 173) or customerName LIKE '%gif%' ORDER BY phone LIMIT 5;
customers table ထဲက customerNumber,customerName,phone တွေကို ပြမယ်။ customerNumber က 169 ပါမယ်။ 169 ထက်ကြီးမယ်။ ဒါပေမယ့် 173 ပါမယ်။ 173 ထက် ငယ်မယ်။ သို့မဟုတ် customerName ထဲမှာ gif ဆိုသည့် စာလုံးပါရမယ် လို့ ဆိုလိုတာပါ။
DISTINCT
DISTINCT ကတော့ SELECT ထဲမှာ duplicate ဖြစ်နေတာတွေ ဖယ်ထုတ်ပြီး ပြပေးပါတယ်။
SELECT DISTINCT(status) FROM orders;
ဆိုရင် orders ထဲမှာ ရှိသည့် status အမျိုးအစားကို သာ ဖော်ပြပါလိမ့်မယ်။
+------------+
| status     |
+------------+
| Shipped    |
| Resolved   |
| Cancelled  |
| On Hold    |
| Disputed   |
| In Process |
+------------+
ထပ်နေတာတွေကို ဖယ်ထုတ်ပြီး ရလဒ်ကို ကြည့်ချင်ရင်တော့ DISTINCT ကို သုံးနိုင်ပါတယ်။
Chapter 5
INSERT
အခု customers table ထဲကို data ထည့်ရအောင်။ Data ထည့်သွင်း ဖို့ အတွက် လက်ရှိ table မှာ ဘယ် column တွေပါလဲ အရင် ထုတ်ကြည့်ဖို့ လိုပါတယ်။
describe customers;
+------------------------+---------------+------+-----+---------+-------+
| Field                  | Type          | Null | Key | Default | Extra |
+------------------------+---------------+------+-----+---------+-------+
| customerNumber         | int(11)       | NO   | PRI | NULL    |       |
| customerName           | varchar(50)   | NO   |     | NULL    |       |
| contactLastName        | varchar(50)   | NO   |     | NULL    |       |
| contactFirstName       | varchar(50)   | NO   |     | NULL    |       |
| phone                  | varchar(50)   | NO   |     | NULL    |       |
| addressLine1           | varchar(50)   | NO   |     | NULL    |       |
| addressLine2           | varchar(50)   | YES  |     | NULL    |       |
| city                   | varchar(50)   | NO   |     | NULL    |       |
| state                  | varchar(50)   | YES  |     | NULL    |       |
| postalCode             | varchar(15)   | YES  |     | NULL    |       |
| country                | varchar(50)   | NO   |     | NULL    |       |
| salesRepEmployeeNumber | int(11)       | YES  | MUL | NULL    |       |
| creditLimit            | decimal(10,2) | YES  |     | NULL    |       |
+------------------------+---------------+------+-----+---------+-------+
ဆိုပြီး တွေ့ရပါမယ်။ Null ကို YES ပေးထားတာတွေက insert လုပ်သည့်အခါမှာ မထည့်လည်း ရသည့် သဘောပါ။ NO ပေးထားသည့် columns တွေကတော့ မဖြစ်မနေ ထည့်ရပါမယ်။
Type ကိုလည်း သတိထားပြီး ကြည့်ရပါမယ်။ int ကတော့ integer ဖြစ်သည့် အတွက်ကြောင့် number ပဲ ထည့်ရပါမယ်။ varchar ဆိုရင်တော့ string ပါ။ varchar(50) ဆိုတာကတော့ စာလုံးရေ ၅၀ ပဲ အများဆုံး ထည့်လို့ရပါမယ်။ varchar(15) ဆိုရင်တော့ စာလုံးရေ ၁၅ လုံးပဲ ရမယ့် သဘောပါ။ decimal ဆိုရင်တော့ ဒဿမ ထည့်ရမယ့် သဘောပါ။
INSERT ထည့် ဖို့ အတွက် Syntax လေးက အောက်ပါ အတိုင်း ဖြစ်ပါတယ်။
INSERT INTO [TABLE] ([COLUMN],[COLUMN],[COLUMN]) VALUES ([VALUES],[VALUES],[VALUES]);
INSERT INTO ပြီးလျှင် table အမည်လာပါတယ်။ ကွင်းစ ကွင်းပိတ်မှာ column order ထည့်ပါတယ်။ ပြီးလျှင် VALUES လာပါတယ်။
ကွင်းစ ကွင်းပိတ်မှာ column order အတိုင်း ထည့် ချင်သည့် value ကို ထည့်ပါတယ်။
ဥပမာ
INSERT INTO USERS (`name`,`phone`,`address`) VALUES ('Mg Mg','09974443332','No 444, KKK Street');
အကယ်၍ row တွေအများကြီး ကို တစ်ခါတည်း ထည့်ချင်ရင်တော့
INSERT INTO USERS (`name`,`phone`,`address`) VALUES
('Mg Mg','09974443332','No 311, KKA Street') ,
('Aye Aung','09974443332','No 222, BK Street') ,
('Bo Bo','09974443332','No 112, MK Street') ,
('Toe Toe','09974443332','No 523, HHK Street');
အခု ကျွန်တော်တို့တွေ customers table ထဲကို ထည့်ကြည့်ရအောင်။
INSERT INTO customers (`customerNumber`,`customerName`,`contactLastName`,`contactFirstName`,`phone`, `addressLine1`,`city`,`country`) VALUES
(500,'Customer 1','Sample Customer 1','Contact 1','099999999','Address 1','Yangon','Myanmar');
အဲဒီ SQL ကို run လိုက်ရင်
Query OK, 1 row affected (0.003 sec)
ဆိုပြီး တွေ့ရပါမယ်။ အဲဒါဆိုရင်တော့ data သွင်းပြီးပါပြီ။ ပြန်ထုတ်ကြည့်ရအောင်။
SELECT * FROM customers WHERE `customerNumber` = 500;
ကျွန်တော်တို့ ထည့်ထားသည့် row ကို မြင်ရပါလိမ့်မယ်။
INSERT INTO customers (`customerNumber`,`customerName`,`contactLastName`,`contactFirstName`,`phone`, `addressLine1`,`city`,`country`) VALUES
(501,'Customer 2','Sample Customer 1','Contact 1','099999999','Address 1','Yangon','Myanmar'),
(502,'Customer 2','Sample Customer 1','Contact 1','099999999','Address 1','Yangon','Myanmar'),
(503,'Customer 2','Sample Customer 1','Contact 1','099999999','Address 1','Yangon','Myanmar');
အဲဒါဆိုရင်တော့ row ၃ ခု ဝင်သွားတာကို တွေ့နိုင်ပါတယ်။
Query OK, 3 rows affected (0.001 sec)
Records: 3  Duplicates: 0  Warnings: 0
အခုဆိုရင်တော့ INSERT ပိုင်းကို သိပါပြီ။ Update ကို ဆက်လေ့လာရအောင်။
Chapter 6
Update
Update လုပ်ဖို့ အတွက် ရေးရသည့် code ကတော့ လွယ်ကူ ရိုးရှင်းပါတယ်။
UPDATE [Table] SET [COLUMN] = [VALUE] WHERE [CONDITION]
အစမ်း ရေးကြည့်ရအောင်။
SELECT customerNumber,customerName FROM customers WHERE customerNumber = 103;
ဆိုရင်
+----------------+-------------------+
| customerNumber | customerName      |
+----------------+-------------------+
|            103 | Atelier graphique |
+----------------+-------------------+
ဆိုပြီး ထွက်လာပါတယ်။ အခု customer name ကို update လုပ်ပါမယ်။
UPDATE customers SET customerName = "HELLO WORLD" WHERE customerNumber = 103;
ပြီးလျှင်
select customerNumber,customerName from customers where customerNumber = 103;
ပြန်ကြည့်ကြည့်ပါ။
+----------------+-------------------+
| customerNumber | customerName      |
+----------------+-------------------+
|            103 | HELLO WORLD       |
+----------------+-------------------+
ဆိုပြီး update ဖြစ်သွားပါမယ်။
condition က more than one ဖြစ်နိုင်ပါတယ်။ ဥပမာ
UPDATE customers SET customerName = "HELLO WORLD" WHERE customerNumber = 103 or contactLastName = "Schmitt";
ဒါဆိုရင်တော့ customerNumber = 103 သို့မဟုတ် contactLastName = "Schmitt" ဖြစ်သည့် record တွေ အားလုံးရဲ့ customerName ကို HELLO WORLD လို့ ပြောင်းသွားမှာပါ။
အဆိုရင်တော့ basic ကို သဘောပေါက်လောက်ပါပြီ။ နောက် တဆင့် အနေနဲ့ DELETE ကို ဆက်သွားရအောင်။
Chapter 7
DELETE
DELETE ကတော့ database ထဲမှာ မလိုချင်သည့် အချက်အလက်တွေကို ဖျက်ဖို့ အတွက်ပါ။
DELETE FROM [Table] WHERE [CONDITION]
DELETE ကတော့ လွယ်ကူပါတယ်။
DELETE FROM orderdetails where orderNumber = 10425;
ဆိုရင်တော့ orderNumber = 10425 ဖြစ်သည့် row က orderdetails ကနေ ပျက်သွားမှာ ဖြစ်ပါတယ်။
SELECT * FROM orderdetails where orderNumber = 10425;
ပြန်ရှာကြည့်ရင် ရှာတွေ့တော့မှာ မဟုတ်ပါဘူး။
Chapter 8
Database Keys and Relationship
Database Keys
Database Normalization မလုပ်ခင်မှာ Database မှာ အသုံးပြုသည့် Key အခေါ်အဝေါ်တွေကို သိဖို့လိုပါတယ်။ ပထမဆုံး အောက်က Table ကို လေ့လာကြည့်ပါ။
Student Table
| student_id | name | phone | age |
|---|---|---|---|
| 1 | Ba Oo | 09976554398 | 18 |
| 2 | Aye Maung | 09796553118 | 22 |
| 3 | Pyone Cho | 09501231421 | 22 |
| 4 | Ko Oo | 0951412321 | 19 |
Super Key
Super Key ကတော့ column တစ်ခု သို့မဟုတ် တစ်ခု ထက်မက လည်း ဖြစ်နိုင်ပါတယ်။ Unique ဖြစ်သည့် column အမျိုးအစားပါ။
student_id , student_id + name , phone စတာတွေက key ပါပဲ။ age ကတော့ student ကို ကိုယ်စားမပြုနိုင်ပါဘူး။ student_id က student တစ်ယောက်တည်းကို ကိုယ်စားပြုနိုင်တယ်။ name က duplicate ဖြစ်နိုင်တယ်။ ဒါပေမယ့် student_id + name ဆိုပြီး column ၂ ခု ပေါင်းရင် student ကို ကိုယ်စားပြုနိုင်ပါတယ်။ phone လည်း အတူတူပါပဲ။
key တွေ အကုန်လုံးက super key လို့ ခေါ်ပါတယ်။
Candidate Key
- Candidate Key က ဘယ်တော့မှ Null မဖြစ်ရဘူး သို့မဟုတ် Empty မဖြစ်ရပါဘူး။ unique (value မထပ်ခြင်း) ဖြစ်ရပါမယ်။
- Table တစ်ခုမှာ တစ်ခုထက်မက candidate key ပါဝင်နိုင်ပါတယ်။
- Candidate Key က Column တစ်ခု သို့မဟုတ် တစ်ခု ထက် မကလည်း ဖြစ်နိုင်ပါတယ်။
Student table မှာ ဆိုရင်တော့ student_id နှင့် phone က candidate key တွေဖြစ်ပါတယ်။
Primary Key
Primary key ကိုတော့ candidate key ထဲက ရွေးချယ်ပါတယ်။ student_id နှင့် phone မှာ ဆိုရင်တော့ Primary key အနေနဲ့က student_id ထားဖို့ သင့်တော်ပါတယ်။ phone number က ကျောင်းသားက ပြောင်းနိုင်ပေမယ့် student_id ကတော့ မပြောင်းပါဘူး။ နောက်ပြီး primary key က database ကနေ auto increment လုပ်သွားပါတယ်။
Foreign Key
Foreign key ကတော့ table တစ်ခု နဲ့ တစ်ခု relationship အနေနဲ့ အသုံးပြုပါတယ်။
Foriegn Key ကို နားလည် အောင် နောက်ထပ် Branch table ထပ်ဖြည့်ပါမယ်။
Branch Table
| branch_code | branch_name | HOD |
|---|---|---|
| CS | Computer Science | Daw Swe Swe |
| CT | Computer Technology | U Thein Maung |
အခု Student Table မှာ branch ထပ်ဖြည့်ပါမယ်။
| student_id | name | phone | age | branch_code |
|---|---|---|---|---|
| 1 | Ba Oo | 09976554398 | 18 | CS |
| 2 | Aye Maung | 09796553118 | 22 | CS |
| 3 | Pyone Cho | 09501231421 | 22 | CT |
| 4 | Ko Oo | 0951412321 | 19 | CT |
အခုဆိုရင် branch_code က student table မှာ Foreign Key အနေဖြင့် ရှိပါတယ်။
Student Table မှာ Branch Table မှာ မရှိသည့် branch code ကို ထည့်ခွင့်မရှိပါဘူး။ Branch table မှာလည်း branch_code ကို ဖျက်လို့မရပါဘူး။ ဖျက်သည့် အခါမှာတော့ student table မှာ reference ရှိနေသည့် အတွက် error တက်လာပါမယ်။ Student table မှာ ဖျက်ချင်သည့် branch code ကို ပြင်ပြီးမှ ဖျက်လို့ရပါမယ်။
Composite Key
Key ဟာ column တစ်ခု ထက် ပိုပါနေသည့် key ကို Composite လို့ ခေါ်ပါတယ်။ Student table မှာ student_id + name နဲ့ composite key ဖြစ်ပါတယ်။
Compound Key
Composite Key ထဲက column တစ်ခုဟာ foreign key ဖြစ်ခဲ့ရင် compound key လို့ သတ်မှတ်ပါတယ်။
Student table မှာ ဆိုရင် student_id + branch_code ဟာ Compound key ဖြစ်ပါတယ်။
Surrogate Key
Surrogate Key ဆိုတာက primary key အနေနဲ့ အသုံးပြုထားပြီး အဓိက index နဲ့ search အတွက် အသုံးပြုဖို့ အတွက် ဖန်တီးထားသည့် key ပါ။ MySQL မှာဆိုရင်တော့ auto_increment အနေနဲ့ အသုံးပြုပါတယ်။ သီးသန့် သတ်မှတ်ထားတာ မဟုတ် ပဲ row တစ်ကြောင်းထည့်တိုင်း အလိုလို 1 တိုးသွားပါတယ်။
ဥပမာ
| surrogate_key | branch_code | branch_name | HOD |
|---|---|---|---|
| 1 | CS | Computer Science | Daw Swe Swe |
| 2 | CT | Computer Technology | U Thein Maung |
Chapter 9
Normalization
Database အခြေခံကို CRUD သိပြီဆိုရင်တော့ Normalization ကို လေ့လာလို့ ရပါပြီ။ Database ကို ဖန်တီးသည့် အခါမှာ Normalization တွေကို level အလိုက် ခွဲပြီး ဖန်တီးပါတယ်။
Normalization ဆိုတာကတော့ Data တွေ ဖောင်းပွမှု မရှိအောင် နဲ့ Table တွေ ချိတ်ဆက်ပြီး အသုံးပြုနိုင်အောင် အဆင့်ဆင့် ခွဲချပြီး data တွေ အဆင်ပြေ ကျစ်လစ်အောင် ဖန်တီးထားခြင်း ဖြစ်ပါတယ်။
Normalization မှာ
- 1NF (First Normal Form)
- 2NF (Second Normal Form)
- 3NF (Third Normal Form)
- BCNF (Boyce-Codd Normal Form)
စသည်ဖြင့် ရှိပါတယ်။
Normalization မလုပ်ထားသည့် အခါမှာ Data တွေကို Insert/Delete/Update ပြုလုပ်သည့် အခါမှာ အဆင်မပြေတော့ပါဘူး။
ဥပမာ ကြည့်ရအောင်။
| rollno | name | branch | hod | office_tel |
|---|---|---|---|---|
| 1 | Aung Moe | CS | U Kyaw | +9599999999 |
| 2 | Khin Khin | CS | U Kyaw | +9599999999 |
| 3 | Myo Min | CS | U Kyaw | +9599999999 |
| 4 | Kyaw Gyi | CS | U Kyaw | +9599999999 |
အထက်ပါ Table ကို ကြည့်ရင် Branch , HOD (Head of Department), Office Telephone စတာတွေက တူပြီး ထပ်နေတာကို တွေ့ရပါလိမ့်မယ်။ ကျောင်းသား အသစ်ထည့်သည့် အခါမှာ data တွေကို ထပ်ပြီး ထပ်နေလိမ့်မယ်။ Table size ဟာလည်း ကြီးနေပါလိမ့်မယ်။
ဖျက်သည့်အခါမှာလည်း branch information တွေပါ ပျက်ကုန်ပါတယ်။ Student မရှိတော့သည့်အခါမှာ branch information တွေပါ ပျောက်ကုန်ပါလိမ့်မယ်။ U Kyaw ကနေ U Min ပြောင်းသွားသည့်အခါမှာ တစ်ကြောင်းဆီကို ပြန်ပြောင်းပေးနေရပါမယ်။
Normalization ပြုလုပ်သည့်အခါမှာတော့ Student Table နဲ့ Branch information ခွဲထုတ်ပါမယ်။
Branch Table
| branch | hod | office_tel |
|---|---|---|
| CS | U Kyaw | +9599999999 |
Student Table
| rollno | name | branch |
|---|---|---|
| 1 | Aung Moe | CS |
| 2 | Khin Khin | CS |
| 3 | Myo Min | CS |
| 4 | Kyaw Gyi | CS |
အခု ဆိုရင် Student တစ်ယောက်ထည့်ရင် branch name ပဲ ထည့်ရပါတတော့မယ်။ Student record တွေ အကုန် ဖျက်လိုက်ရင်တောင် branch information မပျောက်သွားတော့ပါဘူး။
U Kyaw ကနေ U Min ပြောင်းမယ်ဆိုရင်လည်း Branch Table မှာပဲ တစ်ကြောင်းတည်း သွားပြင်လိုက်ရင် ရပါပြီ။
အခုဆိုရင်တော့ Normalization ဘာကြောင့်လိုတယ် ဆိုတာ သဘောပေါက်လောက်ပြီထင်ပါတယ်။
1NF (First Normal Form)
1NF က ပထမဆုံး အဆင့်ဖြစ်သည့်အတွက် လက်ရှိ ရှိနေသည့် data တွေဟာ bad database design ဖြစ်နေမှသာ 1NF ကို စလို့ရပါမယ်။
1NF အတွက် စမယ်ဆိုရင်
- Column တစ်ခုမှာ data တွေဟာ multiple ပါလို့မရပါဘူး။
- Column Value တွေသိမ်းသည့်အခါမှာ same format ဖြစ် ဖို့ လိုပါတယ်။ DOB, Name လို့ သိမ်းထားပြီး နောက် row တစ်ခုမှာ Name, DOB ပြောင်းသိမ်းလို့မရပါဘူး။
- Column တွေမှာ နာမည်ထပ်နေလို့မရပါဘူး။ ဥပမာ Name, Name အစား First_Name, Second_Name လို့ပြောင်းပေးဖို့ လိုပါတယ်။
| rollno | name | subject |
|---|---|---|
| 1 | Aung Myo | Java, Python |
| 2 | Khin Khin | Java |
| 3 | Myo Min | C++ , C |
| 4 | Kyaw Gyi | Python |
အထက်ပါ table ကို ကြည့်ရင် subject ထဲမှာ value တစ်ခု ထက် ပိုပါနေတာကို တွေ့နိုင်ပါတယ်။ 1NF နဲ့ ကိုက်အောင် အောက်ပါအတိုင်း ပြင်နိုင်ပါတယ်။
| rollno | name | subject |
|---|---|---|
| 1 | Aung Myo | Java |
| 1 | Aung Myo | Python |
| 2 | Khin Khin | Java |
| 3 | Myo Min | C++ |
| 3 | Myo Min | C |
| 4 | Kyaw Gyi | Python |
အခုဆိုရင်တော့ 1NF နဲ့ ကိုက်သွားပြီ။ 2NF ကို သွားရအောင်။
2NF (Second Normal Form)
2NF အတွက် လိုက်နာရမယ့် Rule ကတော့
- 1NF လုပ်ထားပြီး ဖြစ်ရမယ်။
- Partial Dependency မဖြစ်ရဘူး
Partial Dependency မဖြစ်ရဘူး အတွက် Dependency ကို နားလည်ဖို့ လိုပါတယ်။
Student Table ကို အရင် ကြည့်ရအောင်။
| student_id | name | reg_no | branch | address |
|---|---|---|---|---|
| 1 | Aung Myo | CS-202080702 | CS | No 443, Aw Ba Road, Yangon |
| 2 | Aung Myo | CT-202080707 | CT | No 43, Bandola Road, Yangon |
အခု table မှာ student_id က primary key ပါ။ Primary Key ဆိုတာကတော့ table မှာ unique ဖြစ်ပါတယ်။ တနည်းပြောရင် မထပ်ရပါဘူး။ student_id 1 က နှစ်ယောက် ဖြစ်နေလို့ မရပါဘူး။ Primary key ကို indexing အတွက်လည်း အသုံးပြုပါတယ်။ ဥပမာ student_id 2 ရဲ့ branch ကို ပြပါဆိုရင် CT ဆိုတာကို တစ်ခါတည်း သိနိုင်သည့် သဘောပါ။ ကျွန်တော် တို့ ဟာ တခြား table တွေနဲ့ တွဲ သုံးဖို့က stuent_id တစ်ခု ပဲလိုပါတယ်။ အခြား column တွေဟာ student_id ပေါ်မှာ မှီခိုနေပါတယ်။ အခုဆိုရင် Dependency ကို နားလည်ပြီ ထင်ပါတယ်။ အခုလိုမျိုးကို Functional Dependency လို့လည်း ခေါ်ပါတယ်။
Partial Dependency
Student Table ပြီးတော့ subject ကို ကြည့်ရအောင်။
| subject_id | subject_name |
|---|---|
| 1 | Java |
| 2 | C++ |
| 3 | Php |
အခု subject table မှာကတော့ subject_id က primary key အနေနဲ့ သုံးထားပါတယ်။
အခု Student table နဲ့ Subject Table ကို ချိတ်ထားသည့် Score Table တစ်ခု ထပ်ဖြည့်ပါမယ်။
| score_id | student_id | subject_id | mark | teacher |
|---|---|---|---|---|
| 1 | 10 1 | 70 | 80 | Java Teacher |
| 2 | 10 1 | 75 | 81 | C++ Teacher |
| 3 | 10 2 | 75 | 77 | C++ Teacher |
| 4 | 11 1 | 80 | 79 | Java Teacher |
score_id က primary key အနေနဲ့ သုံးထားပါတယ်။
Student Id နဲ့ Subject ID ပေါင်းပြီးမှသာ လိုချင်သည့် score ကို ဆွဲထုတ်လို့ရပါမယ်။ Student ID နဲ့ ဆိုရင်တော့ subject_id ၂ ခုရှိနေရင် ၂ ခု ထွက်လာပါလိမ့်မယ်။ subject_id 75 ကို ဆွဲထုတ်ရင် student id တစ်ခု ထက်မက ပါလာပါလိမ့်မယ်။ ဒါကြောင့် score table မှာ student_id နဲ့ subject_id ကို ဆွဲထုတ်မှသာ mark ကို ရပါမယ်။ mark က student_id နဲ့ subject_id ကို depend ဖြစ်နေပမယ့် teacher ကတော့ subject_id ပေါ်မှာပဲ depend ဖြစ်နေတာပါ။ အဲဒါကို Partial Dependency လို့ ခေါ်ပါတယ်။
Partial Dependency ကို ဖြေရှင်းခြင်း
2NF အရ Partial Dependency မဖြစ်ရပါဘူး။ Teacher ကို score table ကနေ ခွဲထုတ်ရပါမယ်။ Teacher ကို ထုတ်ပြီးရင် ဘယ်လို အသုံးပြုရမလဲ ဆိုတာကို အမျိုးမျိုး ဖြစ်နိုင်ပါတယ်။
| score_id | student_id | subject_id | mark |
|---|---|---|---|
| 1 | 10 1 | 70 | 80 |
| 2 | 10 1 | 75 | 81 |
| 3 | 10 2 | 75 | 77 |
| 4 | 11 1 | 80 | 79 |
| subject_id | subject_name | teacher |
|---|---|---|
| 1 | Java | Java Teacher |
Subject table ထဲမှာ Teacher ကို ထည့်နိုင်သလို teacher table သီးသန့် လည်း ခွဲထုတ်နိုင်ပါတယ်။
| teacher_id | name |
|---|---|
| 1 | Java Teacher |
| 2 | PHP Teacher |
ဒါဆိုရင် partial Dependency မဖြစ်တော့ပါဘူး။ အခု 3NF ကို ဆက်လေ့လာရအောင်။
+++
3NF (Third Normal Form)
3NF အတွက်
- 2NF လုပ်ထားပြီး ဖြစ်ရမည်။
- Transitive Dependency မဖြစ်ရပါဘူး။
အခု ကျွန်တော်တို့မှာ အောက်ပါ Table တွေ ရှိပါတယ်။
Student Table
- student_id (Primary Key)
- name
- reg_no
- branch
- address
Score Table
- score_id (Primary Key)
- student_id (Foreign Key)
- subject_id (Foreign Key)
- marks
Subject Table
- subject_id (Primary Key)
- subject_name
- teacher
ကျွန်တော်တို့ exam name နဲ့ total marks ကို ထည့်ဖို့ ကျန်ပါသေးတယ်။ အခု exam name နဲ့ total marks ကို score table ထဲကို ထည့်လိုက်ပါမယ်။
Score Table
- score_id (Primary Key)
- student_id (Foreign Key)
- subject_id (Foreign Key)
- marks
- exam_name
- total_marks
ဥပမာ အားဖြင့် score table က အောက်ကလို ဖြစ်ပါမယ်။
| score_id | student_id | subject_id | marks | exam_name | total_marks | | -------- | ----------- | ---------- | -- --- | ------- | | 1 | 23 | 123 | 78 | Workshop | 200 |
exam_name က student_id + subject_id ပေါ်မှာ depend ဖြစ်နေပါတယ်။ Exam name က student ပေါ်မှာ မူတည်ပြီးတော့ ဘယ်သူ ဖြေမှာလဲ ဆိုတာကို သိနိုင်ပါတယ်။ Exam name ဟာလည်း ဘယ် subject လည်း ဆိုတာကို ထပ်ပြီး depend ဖြစ်နေပါတယ်။
သို့ပေမယ့် total marks ကတော့ exam name ပေါ်မှာပဲ depend ဖြစ်ပါတယ်။ exam_name က primary key မဟုတ်ပါဘူး။
အဲဒါက Transitive Dependency ဖြစ်နေတာပါ။၊
အဲဒီ လိုအခါမှာ exam_name နဲ့ total_marks ကို သီးသန့် ခွဲထုတ်ဖို့ လိုပါတယ်။ အဲဒါဟာ 3NF ပါပဲ။ 3NF အတွက် အောက်ပါ အတိုင်း ခွဲထုတ်နိုင်ပါတယ်။
Exam Table
| exam_id | exam_name | total_marks |
|---|---|---|
| 1 | Workshop | 200 |
| 2 | Mains | 70 |
| 3 | Practicals | 30 |
Score Table
| score_id | student_id | subject_id | marks | exam_id |
|---|---|---|---|---|
| 1 | 23 | 123 | 78 | 1 |
အခု ဆိုရင် 3NF ကို သဘောပေါက်ပြီလို ထင်ပါတယ်။
Boyce-Codd Normal Form (BCNF)
Boyce-Codd Normal Form ကို 3.5 NF လို့လည်း ခေါ်ပါတယ်။ အများအားဖြင့် Normalization ကို BCNF အထိပဲလုပ်ကြပါတယ်။ BCNF မှာ
- 3NF ဖြစ်ပြီးသား ဖြစ်ဖို့လိုပါတယ်။
- A ကနေ B ကို Depend ဖြစ်နေဖို့လိုတယ်။ A က super key ဖြစ်နေဖို့ လိုတယ်။
| student_id | subject | professor |
|---|---|---|
| 101 | Java | P.Java |
| 101 | C++ | P.Cpp |
| 102 | Java | P.Java2 |
| 103 | C# | P.Chash |
| 104 | Java | P.Java |
ဒီ Table ကြည့်ရင်
- student id 101 က Java နဲ့ C++ ကို တက်နေပါတယ်။
- subject တိုင်းမှာ သင် သည့် professor နာမည်ပါပါတယ်။
- Subject တစ်ခုကို သင် သည့် professor မတူတာလည်း ဖြစ်နိုင်ပါတယ်။
အခု table မှာ ဆိုရင် student_id + subject က professor ကို depend ဖြစ်နေပါတယ်။
professor က subject ပေါ်မှာ depend ဖြစ်နေပါတယ်။ သို့ပေမယ့် professor က super key မဟုတ်ပါဘူး။ BCNF နဲ့ အဆင်ပြေအောင် professor ကို table ခွဲထုတ်လိုက်ပါမယ်။
Student Table
| student_id | p_id |
|---|---|
| 101 | 1 |
| 101 | 2 |
Professor Table
| p_id | professor | subject | | ---- | ---- | --- | | 1 | P.Java | Java | | 2 | P.Cpp | C++ |
အခု ဆိုရင် BCNF နဲ့ ကိုက်ညီမှုရှိသွားပါပြီ။
Chapter 10
JOIN
JOIN ဆိုတာကတော့ ကျွန်တော်တို့တွေ Table တစ်ခု ထက်ပိုပြီး query ဆွဲထုတ်ချင်သည့် အခါမှာ အသုံးပြုပါတယ်။
JOIN အမျိုးအစားတွေကတော့
- INNER JOIN
- OUTER JOIN
ဆိုပြီး ရှိပါတယ်။
OUTER JOIN မှာ
- LEFT JOIN
- RIGHT JOIN
- FULL JOIN
ဆိုပြီး ရှိပါတယ်။ အောက်ပါ ပုံလေးကို ကြည့်ရင် ပိုရှင်းပါလိမ့်မယ်။
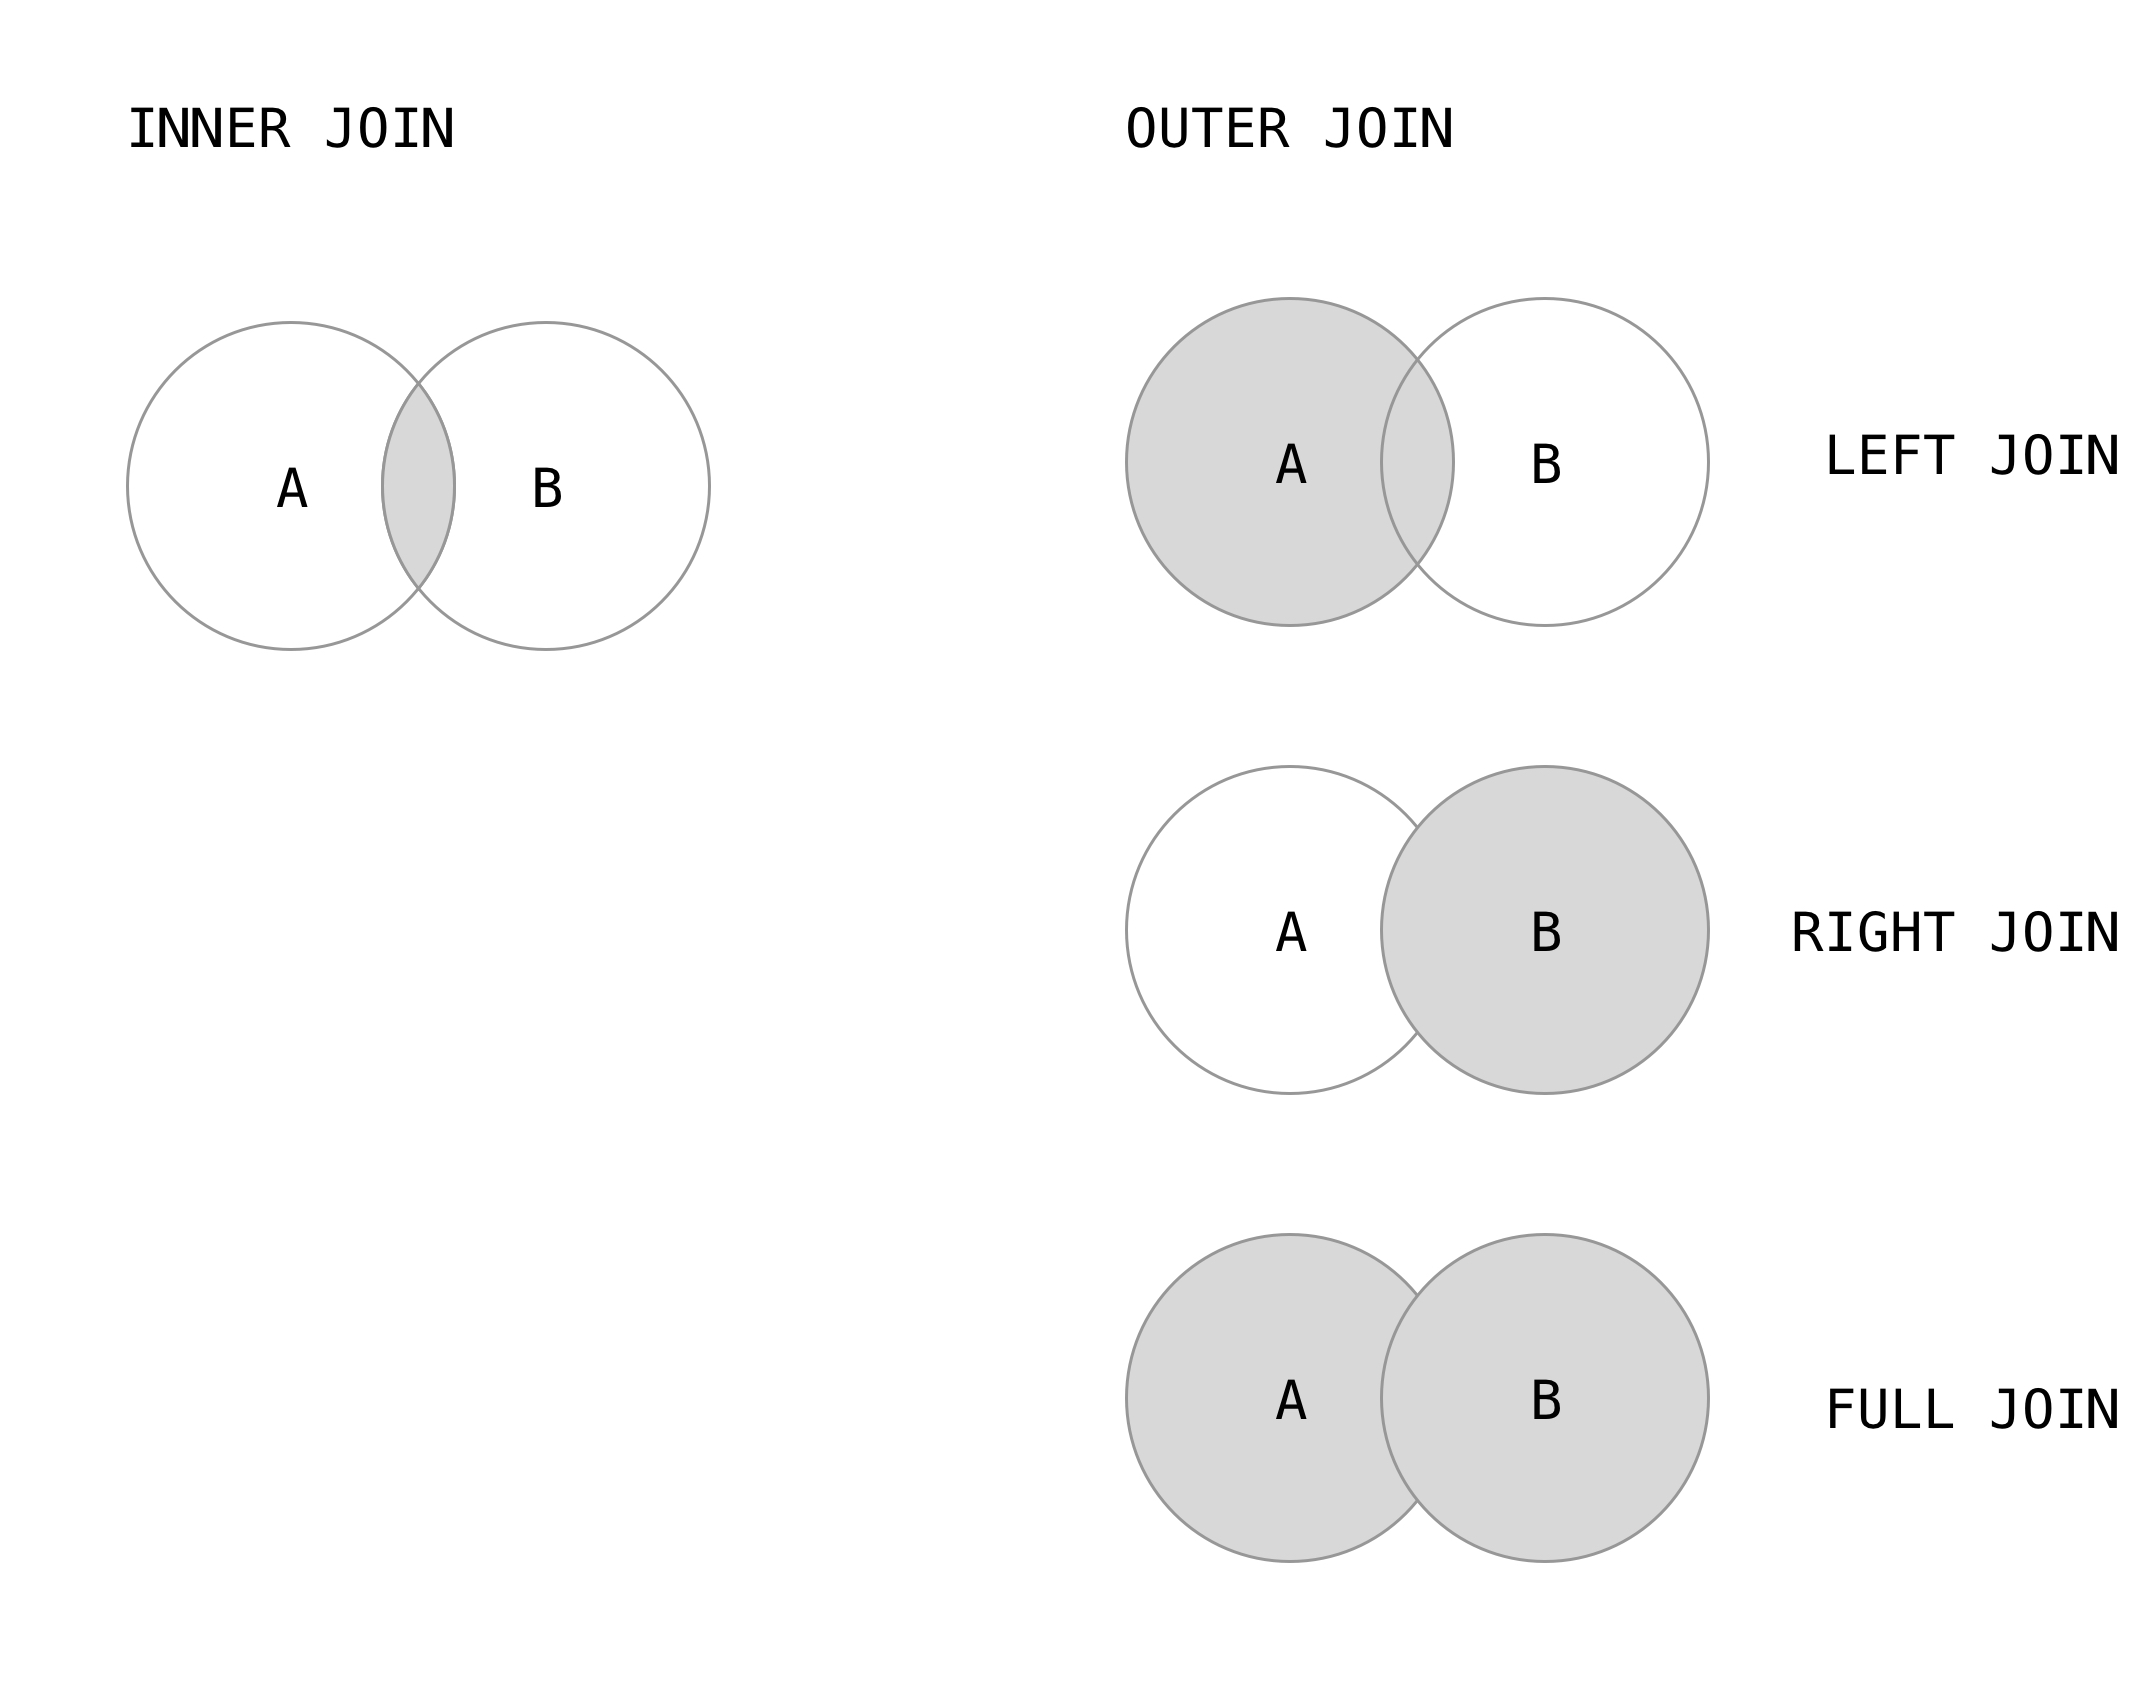
Table ၂ ခုကို ချိတ်ဆက်သည့် အခါမှာတော့ လိုသည့် data တွေကို ဆွဲယူဖို့ အတွက် အသုံးပြုပါတယ်။
Relationship
Join ကို မစခင်မှာ ကျွန်တော်တို့တွေ school database တစ်ခု တည်ဆောက်ရအောင်။
create database myschool;
use myschool;
အခု teacher table ကို တည်ဆောက်ပါမယ်။
create table teachers (
	id int auto_increment primary key,
	name varchar(255) not null);
Teacher table ပြီးတော့ department table ကို တည်ဆောက်ပါမယ်။ department မှာ head teacher အနေနဲ့ teacher နာမည်မထည့်ပဲ teacher table နဲ့ ချိတ်ဆက်ပါမယ်။ teacher id က department table မှာ foreign key ဖြစ်ပါမယ်။
create table departments (
	dep_code varchar(255) not null primary key,
	name varchar(255) not null,
	teacher_id int not null,
	foreign key (teacher_id) references teachers (id) ON DELETE CASCADE
);
အခု ဆိုရင် departments မှာ teacher id နဲ့ ချိတ်ထားပြီးပါပြီ။ teacher_id ဟာ int ဖြစ်ရပါမယ်။
ON DELETE CASCADE ကတော့ teacher table မှာ teacher_id ကို ဖျက်လိုက်ရင် department table မှာ တစ်ခါတည်း ပျက်သွားဖို့ပါ။
အခု student table ဆောက်ပါမယ်။
create table students (
	student_id int auto_increment primary key,
	name varchar(255) not null,
	dep_code varchar(255) not null,
	foreign key (dep_code) references departments (dep_code)
);
အခု student table ကို ဆောက်ပြီးပါပြီ။ student table မှာ department code နဲ့ ချိတ်ထားပါတယ်။ foreign key ထည့်ထားတာ တွေ့နိုင်ပါတယ်။ Department code က ဖျက်လိုက်တာနဲ့ student တွေ အလိုလို မပျက်သွား စေချင်လို့ ON DELETE CASCADE ကို မထည့်ထားပါဘူး။
ပထမဆုံး teachers ကို ထည့်ပါမယ်။ ပြီးရင် department ကို ထည့်ပါမယ်။ နောက်ဆုံးမှ students ကို ထည့်ပါမယ်။
INSERT INTO teachers (name) VALUES
('U Aung Gyi'),
('U Maung Maung Myint'),
('Daw Aung Aung')
;
teachers (name) ဆိုတာကတော့ teachers table ထဲက name column ကို ထည့်မယ် ပြောတာပါ။ ဘာကြောင့်လဲဆိုတော့ auto_increment ကို id မှာ ထည့်သွင်းထားတာကြောင့်ပါ။
အခု teachers table ထဲက နေ ထုတ်ကြည့်ရအောင်။
SELECT * FROM teachers;
+----+---------------------+
| id | name                |
+----+---------------------+
|  1 | U Aung Gyi          |
|  2 | U Maung Maung Myint |
|  3 | Daw Aung Aung       |
+----+---------------------+
အခု ဆိုရင် teachers တွေက id နဲ့ ရပါပြီ။
အခု ကျွန်တော် တို့ department ထည့်ပါမယ်။
INSERT INTO departments (dep_code,name,teacher_id) VALUES
('CS_101','CS 101',1),
('CS_102','CS 102',2),
('CT_101','CT 101',3),
('CT_102','CT 102',3)
;
အခု ဆိုရင် departments table ထဲကို data တွေ ဝင်သွားပါပြီ။ ON DELETE CASCADE ကို အသုံးပြုထားသည့် အတွက် ကြောင့် teacher id 3 ကို teacher ထဲက ဖျက်လိုက်ရင် departments ထဲမှာ ပျက်သွားမှာပါ။
အရင်ဆုံး data ထုတ်ကြည့်ရအောင်။
select * from departments;
+----------+--------+------------+
| dep_code | name   | teacher_id |
+----------+--------+------------+
| CS_101   | CS 101 |          1 |
| CS_102   | CS 102 |          2 |
| CT_101   | CT 101 |          3 |
| CT_102   | CT 102 |          3 |
+----------+--------+------------+
အခု teacher ID 3 ကို ဖျက်ပါမယ်။
DELETE FROM teachers WHERE id = 3;
အခု ပြန်ပြီး ထုတ်ကြည့်ရအောင်။
SELECT * FROM departments;
+----------+--------+------------+
| dep_code | name   | teacher_id |
+----------+--------+------------+
| CS_101   | CS 101 |          1 |
| CS_102   | CS 102 |          2 |
+----------+--------+------------+
ON DELETE CASCADE ထည့်ထားသည့် အတွက်ကြောင့် teachers table မှာ ဖျက်လိုက်တာနှင့် departments မှာလည်း တစ်ခါတည်း ပျက်သွားပါမယ်။
အခု students table မှာ ထည့်ပါမယ်။
INSERT INTO students(name,dep_code) VALUES
('Mg Mg','CS_101'),
('Aung Gyi','CS_101'),
('Yang Aung','CS_101'),
('Kyaw Kyaw','CS_102'),
('Moe Moe','CS_102')
;
အခု students table ကို ထုတ်ကြည့်ရအောင်။
select * from students;
+------------+-----------+----------+
| student_id | name      | dep_code |
+------------+-----------+----------+
|          1 | Mg Mg     | CS_101   |
|          2 | Aung Gyi  | CS_101   |
|          3 | Yang Aung | CS_101   |
|          4 | Kyaw Kyaw | CS_102   |
|          5 | Moe Moe   | CS_102   |
+------------+-----------+----------+
အခု department က CS_102 ကို ဖျက်ကြည့်ရအောင်။
DELETE FROM departments WHERE dep_code = 'CS_102';
students table မှာ dep_code foreign key ရှိသည့် အတွက် ဖျက်လို့ရမှာ မဟုတ်ပါဘူး။
ERROR 1451 (23000): Cannot delete or update a parent row: a foreign key constraint fails (`myschool`.`students`, CONSTRAINT `students_ibfk_1` FOREIGN KEY (`dep_code`) REFERENCES `departments` (`dep_code`))
Students table မှာ ဖျက်ချင်သည့် CS_102 မရှိတော့မှသာ departments မှာ ဖျက်လို့ရပါမယ်။
INNER JOIN
အခု Inner Join ကို စမ်းကြည့်ရအောင်။ Student တွေ တက်ရောက်နေသည့် department name ကို သိချင်တယ်။ အခု ပုံစံ အရ department name ကို dep_code နဲ့ ချိတ်ထားတယ်။ Student တစ်ယောက်ဆီမှာ dep_code ရှိတယ်။ Table ၂ ခု ကို Join ပြီးစမ်းကြည့််ရအောင်။
SELECT students.name,departments.name
FROM students
INNER JOIN departments
ON students.dep_code = departments.dep_code;
+-----------+--------+
| name      | name   |
+-----------+--------+
| Mg Mg     | CS 101 |
| Aung Gyi  | CS 101 |
| Yang Aung | CS 101 |
| Kyaw Kyaw | CS 102 |
| Moe Moe   | CS 102 |
+-----------+--------+
student name နဲ့ department ထွက်လာပါပြီ။ students မှာလည်း name ပါသလို departments မှာလည်း name ပါသည့် အတွက် ဘယ် table က data ယူမလဲ ဆိုတာကို ရေးသားလိုသည့် အတွက် [table].[column] ကို အသုံးပြုပါတယ်။ students.name ဆိုရင် students table ထဲက name ကို ဖော်ပြရန် ဖြစ်ပြီး departments.name ကတော့ departments table ထဲက name ကို ဖော်ပြရန် ဖြစ်ပါတယ်။
INNER JOIN ဖြစ်သည့် အတွက်ကြောင့် students table မှာ ရှိသည့် data နှင့် departments မှာ ရှိသည့် data ၂ ခုလုံး ချိတ်ဆက်ထားသည့် data ကို သာပြပေးမှာပါ။
INNER JOIN ရဲ့ syntax က
SELECT [table1].columns,[table2].columns
FROM [table1]
INNER JOIN [table2]
ON [table1].column = [table2].column
JOIN လုပ်သည့်အခါမှာတော့ table ၂ ခု မှာ တူညီသည့် columns နှင့်သာ ချိတ်ဆက်လို့ရပါတယ်။ နောက်ပြီး WHERE CONDITION ပါ ထပ်ဖြည့်နိုင်ပါတယ်။
အထက်ပါ select ကို အနည်းငယ် ပြန်ပြင်ပါမယ်။
SELECT students.name AS student_name,departments.name as dep_name
FROM students
INNER JOIN departments
ON students.dep_code = departments.dep_code
WHERE departments.dep_code = 'CS_102';
+--------------+----------+
| student_name | dep_name |
+--------------+----------+
| Kyaw Kyaw    | CS 102   |
| Moe Moe      | CS 102   |
+--------------+----------+
အခုဆိုရင် name, name အစား student_name , dep_name ဆိုပြီး ပေါ်လာပါပြီ။ dep_code က CS_102 ဖြစ်သည့် information တွေသာ ပေါ်လာပါမယ်။
LEFT JOIN
အခု table design အရ left join အတွက် အဆင်မပြေပါဘူး။ LEFT JOIN အနေနဲ့ table 1 မှာ table 2 data မပါပဲ ထည့်သွင်းဖို့ ဦးစွာ table ကို ပြင်ပါမယ်။
Studetns Table ကို create လုပ်ခဲ့တုန်းက dep_code ကို not null လို့ ထည့်ခဲ့ပါတယ်။
dep_code varchar(255) not null,
dep_code ကို ကျွန်တော်တို့ nullable ဖြစ်ဖို့ ဦးစွာပြင်ပါမယ်။
ALTER TABLE students MODIFY COLUMN dep_code varchar(255);
အခုဆိုရင် dep_code က NOT NULL ကို ဖြုတ်ပြီးပါပြီ။
အခု students table ထဲကို data ဖြည့်ပါမယ်။
INSERT INTO students (name) VALUES ("Zu Zu"),("Gone Tint");
အခု student table ထဲမှာ dep_code မရှိသည့် name ၂ ခု ထည့်ပြီးပါပြီ။
SELECT * FROM students;
+------------+-----------+----------+
| student_id | name      | dep_code |
+------------+-----------+----------+
|          1 | Mg Mg     | CS_101   |
|          2 | Aung Gyi  | CS_101   |
|          3 | Yang Aung | CS_101   |
|          4 | Kyaw Kyaw | CS_102   |
|          5 | Moe Moe   | CS_102   |
|          6 | Zu Zu     | NULL     |
|          7 | Gone Tint | NULL     |
+------------+-----------+----------+
အခု INNER JOIN ကို ပြန် စမ်းကြည့်ရအောင်။
SELECT students.name as student_name,departments.name as dep_name
FROM students
INNER JOIN departments
ON students.dep_code = departments.dep_code;
+--------------+----------+
| student_name | dep_name |
+--------------+----------+
| Mg Mg        | CS 101   |
| Aung Gyi     | CS 101   |
| Yang Aung    | CS 101   |
| Kyaw Kyaw    | CS 102   |
| Moe Moe      | CS 102   |
+--------------+----------+
dep_code null ဖြစ်နေသည့် student တွေမပါလာပါဘူး။ student အကုန်လုံးပါချင်တယ်။ department name ကိုလည်း ပေါ်အောင် INNER JOIN လုပ်ချင်တယ်ဆိုရင်တော့ LEFT JOIN ကို အသုံးပြုနိုင်ပါတယ်။
SELECT students.name as student_name,departments.name as dep_name
FROM students
LEFT JOIN departments
ON students.dep_code = departments.dep_code;
+--------------+----------+
| student_name | dep_name |
+--------------+----------+
| Mg Mg        | CS 101   |
| Aung Gyi     | CS 101   |
| Yang Aung    | CS 101   |
| Kyaw Kyaw    | CS 102   |
| Moe Moe      | CS 102   |
| Zu Zu        | NULL     |
| Gone Tint    | NULL     |
+--------------+----------+
LEFT JOIN က table 1 က data တွေ အကုန်ဖော်ပြပေးသည့် သဘောပါ။
RIGHT JOIN
RIGHT JOIN ကတော့ table 2 ဘက်က data တွေ အကုန် ဖော်ပြပေးပါတယ်။ အရင် ဆုံး department ဘက်မှာ data အရင် ဖြည့်ပါမယ်။
INSERT INTO departments (dep_code,name,teacher_id) VALUES ("CT_101","Computer Technology 101",1);
CT_101 က student table ထဲမှာ မရှိသေးပါဘူး။
အခု RIGHT JOIN ကို ကြည့်ရအောင်။
SELECT students.name as student_name,departments.name as dep_name
FROM students
RIGHT JOIN departments
ON students.dep_code = departments.dep_code;
+--------------+-------------------------+
| student_name | dep_name                |
+--------------+-------------------------+
| Mg Mg        | CS 101                  |
| Aung Gyi     | CS 101                  |
| Yang Aung    | CS 101                  |
| Kyaw Kyaw    | CS 102                  |
| Moe Moe      | CS 102                  |
| NULL         | Computer Technology 101 |
+--------------+-------------------------+
departments မှာ data ရှိပြီး students table ဘက်မှာ departments နဲ့ မချိတ်ထားသည့် data တွေပါ ထုတ်ထားပါတယ်။
FULL OUTER JOIN
အခု နှစ်ဘက်လုံး က data ကို ဆွဲထုတ်ပါမယ်။ နှစ်ဘက်လုံးက ပါသည့် data ကို လိုချင်ရင်တော့ FULL OUTER JOIN ကို သုံးနိုင်ပါတယ်။ သို့ပေမယ့် MySQL မှာ FULL OUTER JOIN မရှိပါဘူး။
LEFT JOIN နဲ့ RIGHT JOIN ကို UNION ကို သုံးပြီး ထုတ်မှ ရပါမယ်။ Union ဆိုတာကတော့ SQL data ကို ပေါင်းပြီး ပြသ ပေးတာပါ။
SELECT students.name as student_name,departments.name as dep_name
FROM students
LEFT JOIN departments
ON students.dep_code = departments.dep_code

UNION

SELECT students.name as student_name,departments.name as dep_name
FROM students
RIGHT JOIN departments
ON students.dep_code = departments.dep_code;
+--------------+-------------------------+
| student_name | dep_name                |
+--------------+-------------------------+
| Mg Mg        | CS 101                  |
| Aung Gyi     | CS 101                  |
| Yang Aung    | CS 101                  |
| Kyaw Kyaw    | CS 102                  |
| Moe Moe      | CS 102                  |
| Zu Zu        | NULL                    |
| Gone Tint    | NULL                    |
| NULL         | Computer Technology 101 |
+--------------+-------------------------+
UNION ကို OUTER JOIN အတွက်သာ မက အခြား query result ၂ ခု ကိုပေါင်းပြီး ထုတ်ချင်သည့် အခါတွေမှာလည်း သုံးနိုင်ပါတယ်။
Chapter 11
Entity–relationship Model
Entity–relationship model (ERD) ဆိုတာကတော့ Database Design ကို ဖန်တီးရာမှာ အသုံးပြုသည့် Diagram တစ်ခုပါ။ ERD ကို System တစ်ခု အတွက် database design ဆွဲသည့် အခါမှာ ၊ Database ကို ပြန်လည်ပြင်ဆင်လိုသည့် အခါမှာ ရေးဆွဲကြပါတယ်။
Entity
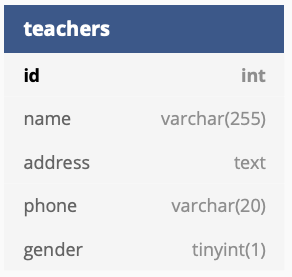
Entity ဆိုတာကတော့ အလွယ်ဆုံးပြောရရင်တော့ table ပါ။ ERD မှာတော့ Entity ဟာ person (Student) , object (Invoice), concept(Profile), event(Transaction) စတာတွေပါ။ ERD မှာ table လို့ မသုံးပဲ Entity လို့ သုံးပါတယ်။ Entity အတွက် Nouns ကိုသာ အသုံးပြုကြပါတယ်။ Teacher Entity ကို အောက်ပါ အတိုင်း ပုံဖော်ပါတယ်။

Entity Attributes
Table မှာ ပါသည့် Column လို့ အလွယ်ပြောနိုင်ပါတယ်။ Entity မှာ ပါသည့် property တွေကို ဖော်ပြထားပါတယ်။ ဥပမာ teachers entity မှာ ဆိုရင် id, name, address, phone စသည့် attribute တွေပါပါတယ်။
Primary Key
Primary key ကို Entity မှာ သိတာထင်ရှားသည့် ပုံစံ အနေနဲ့ Bold သို့မဟုတ် စာရွက်မှာ ဆွဲရင် underline တားထားပါတယ်။ teachers table မှာ ဆိုရင် id က bold ဖြစ်နေပါတယ်။ id ကို primary key ထားထားသည်လို့ ဆိုလိုတာပါ။

Foreign Key
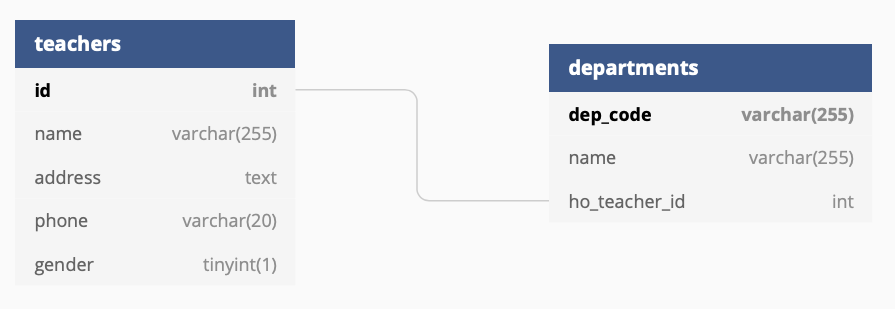
Entity တစ်ခုမှာ primary key ဖြစ်ပြီး အခြား table မှာ ပါဝင်နေသည့် key ပါ။ realtion ချိတ်ဆက်ထားမှု ရှိပါတယ်။
One to One Relationship
One to One ကတော့ entity တစ်ခု မှာ ရှိသည့် primary ဟာ တစ်ကြိမ်ပဲ ပါဝင်ပြီး နောက် table တစ်ခုမှာ Foreign Key အနေနဲ့ တစ်ကြိမ်တည်း ပါဝင်သည့် realtionship မျိုးပါ။
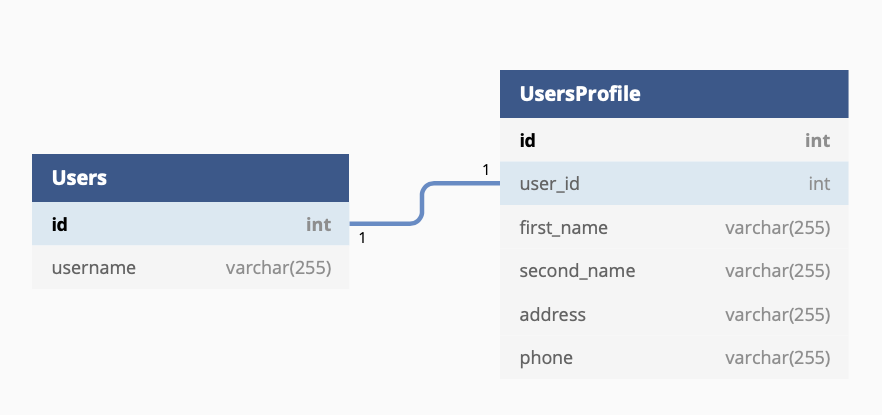
User တစ်ယောက်ဟာ Users table မှာ တစ်ခါတည်းပါပြီး UsersProfile မှာလည်း တစ်ကြိမ်တည်းပါသည့် relationship မျိုးပါ။
+++
One to Many Relationship
Table တစ်ခုမှာ primary key ဖြစ်ပြီး နောက် table တစ်ခုမှာ Foreign key အနေနဲ့ တစ်ခုထက်မက ပါဝင်သည့် သဘောမျိုးပါ။
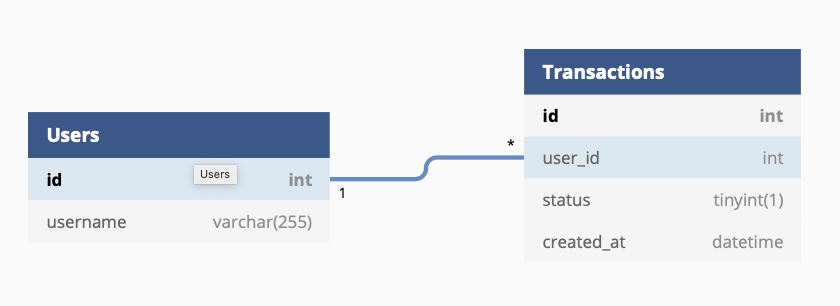
Users တစ်ယောက် users table မှာ တစ်ကြိမ်တည်း ရှိပေမယ့် transactions table မှာတော့ တစ်ကြိမ်ထက်မက ရှိနိုင်သည့် relationship မျိုးပါ။
+++
Many to Many Relationship
Entity မှာ foreign key က တစ်ကြိမ်ထပ်မက ပါနေသည့် relationship မျိုးပါ။
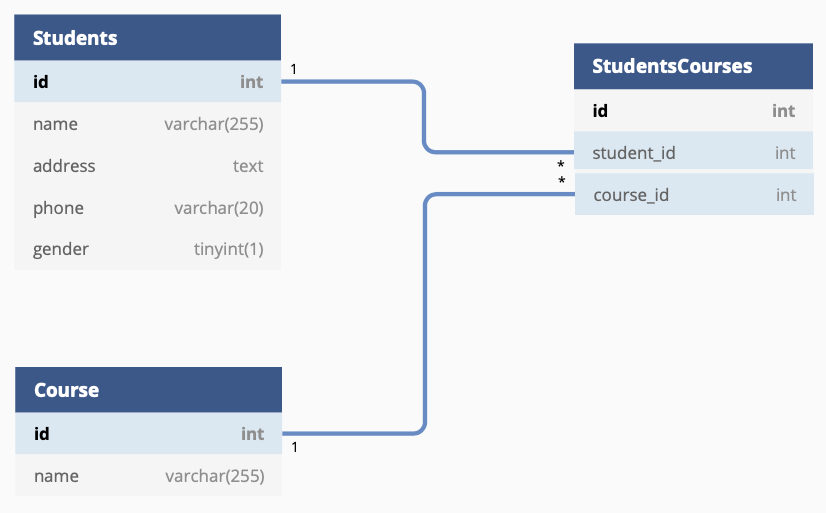
Student တစ်ယောက်ဟာ course တစ်ခု ထက် မက ရှိနိုင်သလို course တစ်ခု ကို ယူထားသည့် student ဟာလည်း အများကြီး ရှိနိုင်သည့် အခါမှာ အထက်ပ many to many relationship ဖြစ်ပါတယ်။
အခု ဆိုရင် ERD အကြောင်းကို အခြေခံလောက် အနည်းငယ်သိပါပြီ။ Project တစ်ခု မစခင်မှာ database design ကို ERD ဖြင့် ဆွဲခြင်းဖြင့် system အကြောင်းကို ပိုမို နားလည်စေနိုင်ပါတယ်။
Chapter 12
FUNCTION
အခု အခန်းမှာတော့ MYSQL နဲ့ ပတ်သက်သည့် function တွေကို လေ့လာရမှာပါ။ MySQL မှာ သုံးလို့ ရသည့် function တွေ အများကြီးရှိပါတယ်။ အဲဒီ အထဲက မှ လူသုံးများသည့် function အချို့ကို ဖော်ပြပေးပါမယ်။
COUNT
အခု table တစ်ခုမှာ row ဘယ်နှစ်ကြောင်းပါမလဲ ဆိုတာကို သိချင်သည့် အခါမှာ count ကို အသုံးပြုနိုင်ပါတယ်။
SELECT COUNT(*) FROM students;
+----------+
| COUNT(*) |
+----------+
|        7 |
+----------+
အကယ်၍ CS_101 မှာ ကျောင်းသား ဘယ်နှစ်ယောက်လဲသိချင်ရင်
SELECT COUNT(*) FROM students WHERE dep_code = 'CS_101';
+----------+
| COUNT(*) |
+----------+
|        3 |
+----------+
စုစုပေါင်း ၃ ယောက်ဆိုတာ တွေ့နိုင်ပါတယ်။
SUM
SUM ကတော့ value တွေကို ပေါင်းဖို့ အတွက်ပါ။ SUM ကို စမ်းဖို့ အတွက် Fees Table ဆောက်ပါမယ်။
CREATE TABLE Fees (
	id int auto_increment primary key,
	dep_code varchar(255) not null,
	amount int not null,
	foreign key (dep_code) references departments (dep_code)
);
အခု fee ထည့်ပါမယ်။
INSERT INTO Fees (dep_code,amount) VALUES
('CS_101',100000),
('CS_102',120000),
('CT_101',150000);
အခု Fee table ထဲမှာ amount တွေ ရှိသွားပါပြီ။
Amount အားလုံး ရဲ့ total value ကို ထုတ်ကြည့်ရအောင်။
SELECT SUM(amount) As Total FROM Fees;
+-------------+
| Total       |
+-------------+
|      370000 |
+-------------+
AVG
Total ကို ရှာပြီး Average ကို ရှာချင်တယ် ဆိုရင် AVG function ကို သုံးနိုင်ပါတယ်။
SELECT AVG(amount) As average FROM Fees;
+-------------+
| average     |
+-------------+
| 123333.3333 |
+-------------+
CS_101 နှင့် CS_102 ၂ ခု ပေါင်း average ကိုရှာကြည့်ပါမယ်။
SELECT AVG(amount) As average FROM Fees where dep_code = 'CS_101' OR dep_code = 'CS_102';
+-------------+
| average     |
+-------------+
| 110000.0000 |
+-------------+
DATE
DATE ကတော့ MySQL မှာ အသုံးများကြပါတယ်။ DATE feature ကို သိရဖို့ အတွက် students table မှာ created_at ကို ထည့်ပါမယ်။
ALTER TABLE students
ADD COLUMN created_at TIMESTAMP default now();
students table မှာ created_at ကို TIMESTAMP value ထည့်လိုက်ပါတယ်။ default value ကို now() ဆိုပြီး ထည့်ထားတာ တွေ့နိုင်ပါတယ်။ now() ကတော့ အခု လက်ရှိ အချိန် ကို ထည့်မယ် လို့ ပြောတာပါ။
students table ထဲ data ဖြည့်ရအောင်။
INSERT INTO students (name)
VALUES ("Kyaw Myint"),
("Moe Aung");
ပြန်ထုတ်ကြည့်ရအောင်။
SELECT * FROM students;
+------------+------------+----------+---------------------+
| student_id | name       | dep_code | created_at          |
+------------+------------+----------+---------------------+
|          1 | Mg Mg      | CS_101   | 2020-10-14 00:14:06 |
|          2 | Aung Gyi   | CS_101   | 2020-10-14 00:14:06 |
|          3 | Yang Aung  | CS_101   | 2020-10-14 00:14:06 |
|          4 | Kyaw Kyaw  | CS_102   | 2020-10-14 00:14:06 |
|          5 | Moe Moe    | CS_102   | 2020-10-14 00:14:06 |
|          6 | Zu Zu      | NULL     | 2020-10-14 00:14:06 |
|          7 | Gone Tint  | NULL     | 2020-10-14 00:14:06 |
|          8 | Kyaw Myint | NULL     | 2020-10-14 00:27:43 |
|          9 | Moe Aung   | NULL     | 2020-10-14 00:27:43 |
+------------+------------+----------+---------------------+
နောက်မှ ထည့်လိုက်သည့် row ၂ ခု က လက်ရှိ အချိန် ဖြစ်နေတာ ကို တွေ့ရပါမယ်။
ကျွန်တော်တို့ အခု လို ပြန်ထုတ်ကြည့်ရအောင်။
SELECT name, date(created_at) as date,
day(created_at) as d,
month(created_at) as m,
year(created_at) as y,
hour(created_at) as h,
minute(created_at) as m,
second(created_at) as s
FROM students;
+------------+------------+------+------+------+------+------+------+
| name       | date       | d    | m    | y    | h    | m    | s    |
+------------+------------+------+------+------+------+------+------+
| Mg Mg      | 2020-10-14 |   14 |   10 | 2020 |    0 |   14 |    6 |
| Aung Gyi   | 2020-10-14 |   14 |   10 | 2020 |    0 |   14 |    6 |
| Yang Aung  | 2020-10-14 |   14 |   10 | 2020 |    0 |   14 |    6 |
| Kyaw Kyaw  | 2020-10-14 |   14 |   10 | 2020 |    0 |   14 |    6 |
| Moe Moe    | 2020-10-14 |   14 |   10 | 2020 |    0 |   14 |    6 |
| Zu Zu      | 2020-10-14 |   14 |   10 | 2020 |    0 |   14 |    6 |
| Gone Tint  | 2020-10-14 |   14 |   10 | 2020 |    0 |   14 |    6 |
| Kyaw Myint | 2020-10-14 |   14 |   10 | 2020 |    0 |   27 |   43 |
| Moe Aung   | 2020-10-14 |   14 |   10 | 2020 |    0 |   27 |   43 |
+------------+------------+------+------+------+------+------+------+
အခု လို date function တွေကို ဆွဲထုတ်ပြီး ကြည့်လိုက်တော့ နားလည်မယ် ထင်ပါတယ်။ ကျွန်တော်တို့ WHERE ကို အသုံးပြုပြီး လိုချင်သည့် date ကို ထုတ်နိုင်ပါတယ်။
SELECT name , date(created_at) as d FROM students WHERE date(created_at) = '2020-10-14';
+------------+------------+
| name       | d          |
+------------+------------+
| Mg Mg      | 2020-10-14 |
| Aung Gyi   | 2020-10-14 |
| Yang Aung  | 2020-10-14 |
| Kyaw Kyaw  | 2020-10-14 |
| Moe Moe    | 2020-10-14 |
| Zu Zu      | 2020-10-14 |
| Gone Tint  | 2020-10-14 |
| Kyaw Myint | 2020-10-14 |
| Moe Aung   | 2020-10-14 |
+------------+------------+
REPLACE
ကျွန်တော့်တို့ Data တွေကို ပြချင်သည့် အခါမှာ မလိုချင်သည့် Data တွေကို ဖြုတ်ပြတာ ဒါမှမဟုတ် Replace လုပ်တာတွေ အတွက် အသုံးပြုနိုင်ပါတယ်။
SELECT REPLACE(dep_code,'CS_','Computer Science ') FROM departments;
+---------------------------------------------+
| REPLACE(dep_code,'CS_','Computer Scinece ') |
+---------------------------------------------+
| Computer Science 101                        |
| CT_101                                      |
| Computer Science 102                        |
+---------------------------------------------+
အခု ဆိုရင် dep_code မှာ CS_ ပါသည့် စာလုံးတွေကို Computer Science ပြောင်းပြီး ပြပေးထားပါတယ်။
BETWEEN
BETWEEN ကတော့ တစ်ခု နှင့် တစ်ခု ကြားက value ကို ထုတ်ချင်သည့် အခါမှာ အသုံးပြုနိုင်ပါတယ်။ အခု studetn id ကို between နဲ့ ထုတ်ကြည့်ပါမယ်။
SELECT * FROM students WHERE student_id BETWEEN 2 AND 7;
+------------+-----------+----------+---------------------+
| student_id | name      | dep_code | created_at          |
+------------+-----------+----------+---------------------+
|          2 | Aung Gyi  | CS_101   | 2020-10-14 00:14:06 |
|          3 | Yang Aung | CS_101   | 2020-10-14 00:14:06 |
|          4 | Kyaw Kyaw | CS_102   | 2020-10-14 00:14:06 |
|          5 | Moe Moe   | CS_102   | 2020-10-14 00:14:06 |
|          6 | Zu Zu     | NULL     | 2020-10-14 00:14:06 |
|          7 | Gone Tint | NULL     | 2020-10-14 00:14:06 |
+------------+-----------+----------+---------------------+
အခုဆိုရင် student_id 2 နဲ့ 7 ကြားက data တွေကို မြင်ရပါလိမ့်မယ်။
MAX
Max ကတော့ လက်ရှိ query ထဲက အကြီးဆုံး value ကို ထုတ်သည့် နေရာမှာ သုံးပါတယ်။
SELECT MAX(student_id) FROM students;
+-----------------+
| MAX(student_id) |
+-----------------+
|               9 |
+-----------------+
MIN
MIN ကတော့ အနည်းဆုံး value ကို ထုတ်တာပါ။
SELECT MIN(student_id) FROM students;
+-----------------+
| MIN(student_id) |
+-----------------+
|               1 |
+-----------------+
RAND
RAND ကတော့ random value ကို ထုတ်ခြင်း ဖြစ်ပါတယ်။ အရင်ဆုံး RAND() ကို စမ်းကြည့်ရအောင်။ RAND() က 0 ကနေ 1 ကြားက value တွေကို random ထုတ်ပေးပါတယ်။
SELECT RAND();
+--------------------+
| RAND()             |
+--------------------+
| 0.3079793921746122 |
+--------------------+
နောက်တစ်ခါတ ထပ်ပြီး ထုတ်ကြည့်ရအောင်။
SELECT RAND();
+--------------------+
| RAND()             |
+--------------------+
| 0.8045441515786054 |
+--------------------+
အခု ကျွန်တော်တို့ student table ထဲက random ကျောင်းသားကို ထုတ်မယ် ဆိုပါတော့။
SELECT * FROM students ORDER BY RAND() LIMIT 1;
+------------+-----------+----------+---------------------+
| student_id | name      | dep_code | created_at          |
+------------+-----------+----------+---------------------+
|          7 | Gone Tint | NULL     | 2020-10-14 00:14:06 |
+------------+-----------+----------+---------------------+
ORDER ကို RAND() နဲ့ စီ ပြီး LIMIT 1 ပဲ ထုတ်ထားသည့် အတွက် ပထမဆုံး ROW ပဲ ထွက်လာခြင်းဖြစ်ပါတယ်။
CONCAT
Column မှာ Data တွေကို ပေါင်းချင်သည့် အခါမှာ CONCAT ကို အသုံးပြုနိုင်ပါတယ်။
SELECT CONCAT("MySQL"," ", "Basic") AS data;
+-------------+
| data        |
+-------------+
| MySQL Basic |
+-------------+
Column က data တွေလည်း ပေါင်းလို့ရပါတယ်။
SELECT CONCAT(student_id, " ---> ",name) FROM students;
+-----------------------------------+
| CONCAT(student_id, " ---> ",name) |
+-----------------------------------+
| 1 ---> Mg Mg                      |
| 2 ---> Aung Gyi                   |
| 3 ---> Yang Aung                  |
| 4 ---> Kyaw Kyaw                  |
| 5 ---> Moe Moe                    |
| 6 ---> Zu Zu                      |
| 7 ---> Gone Tint                  |
| 8 ---> Kyaw Myint                 |
| 9 ---> Moe Aung                   |
+-----------------------------------+
GROUP BY
ကျွန်တော်တို့တွေ GROUP BY ကို Data တွေကို group အလိုက်ကြည့်ချင်သည့် အခါမှာ အသုံးပြုနိုင်ပါတယ်။
SELECT COUNT(*),dep_code FROM students GROUP BY dep_code;
+----------+----------+
| COUNT(*) | dep_code |
+----------+----------+
|        4 | NULL     |
|        3 | CS_101   |
|        2 | CS_102   |
+----------+----------+
အခု query က dep_code အလိုက် ကျောင်းသား အရေအတွက်ကို ထုတ်ကြည့်တာပါ။ COUNT(*) ဆိုတာကတော့ COUNT အရေအတွက်ပါ။ GROU PBY dep_code လို့ ဆိုထားသည့် အတွက်ကြောင့် dep_code နဲ့ GROUP ဖွဲ့ပြီး COUNT အရေအတွက် ကို ထုတ်ခြင်း ဖြစ်ပါတယ်။
HAVING
GROUP BY နဲ့ ထုတ်ထားသည့် data တွေကို WHERE မှာ စစ်လို့ မရပါဘူး။ စစ်ချင်သည့် အခါမှတော့ HAVING ကို သုံးရပါတယ်။ ကျောင်းစုစုပေါင်း ၂ အထက် ရှိရမည့် data ကို ထုတ်ချင်သည့် အခါမှာ WHERE နဲ့ သုံးလို့မရတော့ပါဘူး။
SELECT COUNT(*) AS count, dep_code FROM students GROUP BY dep_code HAVING count > 2;
+-------+----------+
| count | dep_code |
+-------+----------+
|     4 | NULL     |
|     3 | CS_101   |
+-------+----------+
အခု ဆိုရင် MYSQL က function အချို့ကို သိပါပြီ။ MYSQL မှာ FUNCTION တွေ အများကြီး ရှိပြီးတော့ ထပ်ပြီး လေ့လာနိုင်ပါသေးတယ်။
Chapter 13
Index and Partition
Index
MYSQL မှာ data တွေဟာ သန်း ချီ ပြီး ရှိနိုင်ပါတယ်။ 100 Millions records မှာ ဆိုရင် ရှာဖွေ ရတာ ကြာမြင့်နိုင်ပါတယ်။ Data တွေများသည့် အခါမှာ မြန်မြန် ရှာဖွေနိုင်အောင် Indexing ကို အသုံးပြုနိုင်ပါတယ်။
Indexing ဆိုတာ စာအုပ် တစ်အုပ်မှာ ပါသည့် မာတိကာ သဘောမျိုးမှာ။ ဥပမာ Chapater 4 ဟာ စာမျက်နှာ ၄၀ မှာ ရှိတယ် ဆိုရင် Chapter 4 ကို ဖတ်ဖို့ အတွက် စာမျက်နှာ် ၄၀ ကို တန်းပြီးသွားရုံပါပဲ။ တစ်ရွက်ခြင်းဆီ လှန်ပြီး သွားနေဖို့ မလိုပါဘူး။
ပုံမှန် အားဖြင့် primary key မှာ Indexing ပါဝင်ပြီးသား ဖြစ်ပါတယ်။ တခြား columns တွေကို ထည့်ချင်သည့် အခါမှာတော့ Indexing ကို ထည့်နိုင်ပါတယ်။
Index ကို ပထမဆုံး database create လုပ်သည့် အချိန်မှာ ထည့်သွင်းနိုင်ပါတယ်။
create table newstudents (
id int auto_increment primary key,
name varchar(255) not null,
join_date DATE,
bio Text,
room_id int,
created_at timestamp default current_timestamp,
INDEX (name));
အခု code မှာ ဆိုရင် name ကို index လုပ်ထားမယ် လို့ ဆိုပါတယ်။ အကယ်၍ query လုပ်သည့် အခါမှာ name နဲ့ room_id ကို ပေါင်းရှာတတ်တယ် ဆိုရင်တော့ INDEX (name,room_id) ဆိုပြီး column ၂ ခု ပေါင်းပြီး index ထောက်သင့်ပါတယ်။
SHOW INDEX from newstudents;
လက်ရှိ newstudents မှာ ထောက်ထားသည့် index တွေကို ကြည့်တာပါ။
+-------------+------------+----------+--------------+-------------+-----------+-------------+----------+--------+------+------------+---------+---------------+
| Table       | Non_unique | Key_name | Seq_in_index | Column_name | Collation | Cardinality | Sub_part | Packed | Null | Index_type | Comment | Index_comment |
+-------------+------------+----------+--------------+-------------+-----------+-------------+----------+--------+------+------------+---------+---------------+
| newstudents |          0 | PRIMARY  |            1 | id          | A         |           0 |     NULL | NULL   |      | BTREE      |         |               |
| newstudents |          1 | name     |            1 | name        | A         |           0 |     NULL | NULL   |      | BTREE      |         |               |
+-------------+------------+----------+--------------+-------------+-----------+-------------+----------+--------+------+------------+---------+---------------+
PRIMARY key id နဲ့ name ကို ထောက်ထားတာကို တွေ့နိုင်ပါတယ်။
အခု ရှိပြီးသား students table ကို index ထည့်ပါမယ်။
CREATE INDEX name_index ON students(name);
အခု students table ထဲကို name_index ဆိုသည့် နာမည် နဲ့ name ကို index ထောက်ပြီးပါပြီ။
အကယ်၍ ကျွန်တော်တို့ဟာ name နဲ့ dep_code တွဲပြီး query ရှာမယ် ဆိုရင် ၂ ခု တွဲပြီး index ထောက်သင့်ပါတယ်။
SELECT * FROM students WHERE name = 'Moe Moe' and dep_code = 'CS_102';
အခု name နဲ့ dep_code ပေါင်းပြီး index ထောက်ပါမယ်။
CREATE INDEX name_dep ON students(name,dep_code);
အခု ပြန်ပြီး index ကို ကြည့်ရအောင်။
SHOW INDEX from students;
+----------+------------+------------+--------------+-------------+-----------+-------------+----------+--------+------+------------+---------+---------------+
| Table    | Non_unique | Key_name   | Seq_in_index | Column_name | Collation | Cardinality | Sub_part | Packed | Null | Index_type | Comment | Index_comment |
+----------+------------+------------+--------------+-------------+-----------+-------------+----------+--------+------+------------+---------+---------------+
| students |          0 | PRIMARY    |            1 | student_id  | A         |           9 |     NULL | NULL   |      | BTREE      |         |               |
| students |          1 | dep_code   |            1 | dep_code    | A         |           9 |     NULL | NULL   | YES  | BTREE      |         |               |
| students |          1 | name_index |            1 | name        | A         |           9 |     NULL | NULL   |      | BTREE      |         |               |
| students |          1 | name_dep   |            1 | name        | A         |           9 |     NULL | NULL   |      | BTREE      |         |               |
| students |          1 | name_dep   |            2 | dep_code    | A         |           9 |     NULL | NULL   | YES  | BTREE      |         |               |
+----------+------------+------------+--------------+-------------+-----------+-------------+----------+--------+------+------------+---------+---------------+
name_dep နဲ့ name နဲ့ dep_code ကို index ထောက်ထားတာ ကြည့်နိုင်ပါတယ်။
Index ထည့်ခြင်းဟာ SELECT query ကို ပိုမြန်နိုင်သော်လည်း INSERT ထည့်သည့် အခါမှတော့ ပိုနှေးစေပါတယ်။
Partition
MySQL မှာ နောက်ထပ် query တွေကို မြန်စေသည့် နည်းလမ်းကတော့ Partition ထည့်နိုင်ပါတယ်။ Partiion ကို မှန်ကန်စွာ ပိုင်းထားခဲ့လျှင် INSERT , DELETE တွေကို မြန်ဆန်စေပါတယ်။
SHOW PLUGINS;
အဲဒီ query ကို run လိုက်ရင်
| partition | ACTIVE | STORAGE ENGINE | NULL | GPL |
ဆိုတာကို တွေ့ရပါလိမ့်မယ်။
အဲဒါပါခဲ့ရင်တော့ partition ကို အသုံးပြုနိုင်ပါတယ်။
Partition Type
RANGE Partitioning
RANGE ကိုတော့ VALUES LESS THAN နဲ့ အသုံးပြုပါတယ်။ ဥပမာ 2010 ထက် ငယ်တာတွေကို partition တစ်ခု 2011 ထက် ငယ်တာကို partition တစ်ခု ဆိုပြီး ခွဲထုတ် နိုင်ပါတယ်။
CREATE TABLE userslogs (
    username VARCHAR(20) NOT NULL,
    logdata TEXT NOT NULL,
    created DATETIME NOT NULL,
    PRIMARY KEY(username, created)
)
PARTITION BY RANGE( YEAR(created) )(
    PARTITION from_2013_or_less VALUES LESS THAN (2014),
    PARTITION from_2014 VALUES LESS THAN (2015),
    PARTITION from_2015 VALUES LESS THAN (2016),
    PARTITION from_2016_and_up VALUES LESS THAN MAXVALUE
);
Primary Key ကို username နဲ့ created ကို ထားထားပါတယ်။ Partition ခွဲသည့် အခါမှာ primary key နဲ့ ပဲ ခွဲလို့ ရပါမယ်။ ဒါကြောင့် Primary key ကို ကြေငြာသည့် အခါမှာ PRIMARY KEY(username, created) ကို သုံးထားပါတယ်။
PARTITION BY RANGE( YEAR(created) ) ဆိုတာကတော့ created မှာ ပါသည့် date ၏ YEAR အလိုက် ခွဲမယ်လို့ ဆိုတာပါ။ 2014 အောက်ကို from_2013_or_less partition ထဲမှာ ထားပြီးတော့ 2015 အောက်ကို from_2014 မှာ သိမ်းမယ် ဆိုပြီး နေရာတွေ ခွဲသိမ်းထားတာပါ။
လက်ရှိ table မှာ partition ထည့်မယ်ဆိုရင်တော့ ALTER TABLE နဲ့ အသုံးပြုနိုင်ပါတယ်။
ALTER TABLE userslogs
PARTITION BY RANGE( YEAR(created) )(
    PARTITION from_2013_or_less VALUES LESS THAN (2014),
    PARTITION from_2014 VALUES LESS THAN (2015),
    PARTITION from_2015 VALUES LESS THAN (2016),
    PARTITION from_2016_and_up VALUES LESS THAN MAXVALUE
);
ပိုပြီး နားလည် လွယ်ကူအောင် အောက်ကလို table တစ်ခု ဖန်တီးရအောင်။
CREATE TABLE sample (
    a INT,
    b INT,
    PRIMARY KEY (a)
)
PARTITION BY RANGE COLUMNS(a) (
    PARTITION p0 VALUES LESS THAN (10),
    PARTITION p1 VALUES LESS THAN (20),
    PARTITION p2 VALUES LESS THAN MAXVALUE
);
အခု sample ထဲကို data ကို ထည့်ကြည့်ရအောင်။
INSERT INTO sample(a,b) VALUES
(1,10),
(2,10),
(3,10),
(10,10),
(11,10),
(12,10),
(20,10),
(21,10),
(25,10)
;
+----+------+
| a  | b    |
+----+------+
|  1 |   10 |
|  2 |   10 |
|  3 |   10 |
| 10 |   10 |
| 11 |   10 |
| 12 |   10 |
| 20 |   10 |
| 21 |   10 |
| 25 |   10 |
+----+------+
အခု ကျွန်တော်တို့ partition ထဲက data ကို ဆွဲထုတ်ကြည့်ရအောင်။
SELECT * FROM sample PARTITION (p0);
+---+------+
| a | b    |
+---+------+
| 1 |   10 |
| 2 |   10 |
| 3 |   10 |
+---+------+
partition p0 ထဲမှာ LESS THAN 10 ဖြစ်သည့် အတွက် 1,2,3 ပဲ ရှိတာကို တွေ့နိုင်ပါတယ်။
SELECT * FROM sample PARTITION (p1);
+----+------+
| a  | b    |
+----+------+
| 10 |   10 |
| 11 |   10 |
| 12 |   10 |
+----+------+
p1 မှာတော့ 10,11,12 ရှိတာကို တွေ့နိုင်ပါတယ်။ Query နဲ့ ရှာသည့် အခါမှာ ကိုယ့်ရဲ့ data ပေါ်မှာ မူတည်ပြီး သက်ဆိုင်ရာ partition မှာ ရှာဖွေခြင်းဟာ ပိုမို မြန်ဆန် စေပါတယ်။
ဥပမာ
SELECT * FROM sample PARTITION (p2) WHERE a = 20;
ဆိုရင် sample table ရဲ့ partition p2 က a 20 ဖြစ်တာကို သွားရှာပေးမှာ ဖြစ်ပါတယ်။ table တစ်ခု လုံးမှာ ရှာမည့် အစား partition အပိုင်းမှာပဲ ရှာသည့် အတွက်ကြောင့် ပို ပြီးတော့ မြန်ဆန်စေပါတယ်။
LIST Partitioning
LIST partition ကတော့ RANGE လိုမျိုးပါပဲ။ ကွာခြားချက်ကတော့ COLUMN ထဲမှာ ပါသည့် value စာရင်း နဲ့ ကွာခြားပါတယ်။ VALUES IN နဲ့ အသုံးပြုပါတယ်။
CREATE TABLE userslogsList (
    username VARCHAR(20) NOT NULL,
    logdata TEXT NOT NULL,
    created DATETIME NOT NULL,
    PRIMARY KEY(username, created)
)
PARTITION BY LIST( YEAR(created) )(
    PARTITION p0 VALUES IN (2014,2015,2016),
    PARTITION p1 VALUES IN (2017,2018,2019),
    PARTITION p2 VALUES IN (2020,2021,2022)
);
LIST partition မှာ သတိပြုရမှာ က MAXVALUE အသုံးပြုလို့မရပါဘူး။ ဖြစ်နိုင်သမျှ အကုန်
HASH Partitioning
HASH ကတော့ Data value ကို Hash လုပ်ပြီး သိမ်းသည့် အပိုင်းပါ။ Partition ကို အလိုအလျောက် ပိုင်ပေးပါတယ်။ Partition name ကို ကြေငြာနေဖို့ မလိုပါဘူး။ ဒါပေမယ့် Partition ဘယ် ၂ ခု သုံးမလဲ ဆိုတာကို သတ်မှတ်ပေးရပါတယ်။
CREATE TABLE serverlogs2 (
    serverid INT NOT NULL,
    logdata BLOB NOT NULL,
    created DATETIME NOT NULL
)
PARTITION BY HASH (serverid)
PARTITIONS 10;
Hash ကို N = MOD(expr, num) ပုံစံ နဲ့ သိမ်းပါတယ်။ N ဆိုတာကတော့ partiton name ပါ။ expr ကတော့ expression ပါ။ Hash လုပ်ပြီး ထွက်လာမယ့် နံပတ်ပါ။ num ကတော့ number of partition ပါ။
LINEAR HASH Partitioning
Modulo နဲ့ မသုံးချင်ရင်တော့ LINEAR HASH ကို အသုံးပြုနိုင်ပါတယ်။ LINEAR HASH ကိုတော့ data တွေ အရမ်းများလာသည့် အခါမှာ အသုံးပြုသင့်ပါတယ်။
CREATE TABLE serverlogs2 (
    serverid INT NOT NULL,
    logdata BLOB NOT NULL,
    created DATETIME NOT NULL
)
PARTITION BY LINEAR HASH (serverid)
PARTITIONS 10;
HAHS နဲ့ အတူတူပါပဲ။ ကွာသွားတာကတော့ ရှေ့မှာ LINEAR ပါသွားတာပဲ ရှိပါတယ်။
KEY Partitioning
KEY Partition က Hash partition လိုမျိုးပါပဲ။ ဒါပေမယ့် KEY ကို အသုံးပြုရင်တော့ UNIQUE value တစ်ခု ရှိရပါမယ်။
CREATE TABLE serverlogs4 (
    serverid INT NOT NULL,
    logdata BLOB NOT NULL,
    created DATETIME NOT NULL,
    UNIQUE KEY (serverid)
)
PARTITION BY KEY()
PARTITIONS 10;
KEY ကို အခြား COLUMN တွေနဲ့လည်း တွဲသုံးပြီး partition လုပ်နိုင်ပါတယ်။
CREATE TABLE serverlogs5 (
    serverid INT NOT NULL,
    logdata BLOB NOT NULL,
    created DATETIME NOT NULL,
    label VARCHAR(10) NOT NULL
)
PARTITION BY KEY(serverid, label, created)
PARTITIONS 10;
KEY Partition မှာလည်း LINEAR ကို အသုံးပြုနိုင်ပါတယ်။
CREATE TABLE serverlogs6 (
    serverid INT NOT NULL,
    logdata BLOB NOT NULL,
    created DATETIME NOT NULL
)
PARTITION BY LINEAR KEY(serverid)
PARTITIONS 10;
Explain Partition
ကျွန်တော်တို့ query ကို ဆွဲထုတ်လိုက်သည့် အခါမှာ ဘယ် partition ကနေ အလုပ်လုပ်သွားတယ် ဆိုတာကို ပြန်ကြည့်နိုင်ပါတယ်။
SELECT * FROM sample WHERE a = 20;
ကို ဘယ် partition က အလုပ်လုပ်သွားလဲ လို့ သိချင်တယ် ဆိုရင် အောက်က အတိုင်း စစ်နိုင်ပါတယ်။
EXPLAIN PARTITIONS SELECT * FROM sample WHERE a = 20;
+------+-------------+--------+------------+-------+---------------+---------+---------+-------+------+-------+
| id   | select_type | table  | partitions | type  | possible_keys | key     | key_len | ref   | rows | Extra |
+------+-------------+--------+------------+-------+---------------+---------+---------+-------+------+-------+
|    1 | SIMPLE      | sample | p2         | const | PRIMARY       | PRIMARY | 4       | const | 1    |       |
+------+-------------+--------+------------+-------+---------------+---------+---------+-------+------+-------+
partitions မှာ p2 လို့ ရေးထားတာ တွေ့နိုင်ပါတယ်။ a = 20 ကို partition p2 ကနေ ရှာပြီး ထုတ်သွားတာကို တွေ့ရမှာပါ။
Chapter 14
Basic CURD with Python
ကျွန်တော်တို့ MySQL ကို python program တစ်ခု ရေးရအောင်။ အရင်ဆုံး mysql adapter ရှိမရှိ စမ်းကြည့်ရအောင်။
$ python
>>> import mysql.connector
အကယ်၍ ဘာ error မှ မရှိရင်တော့ mysql နှင့် python ကို သုံးလို့ရပါပြီ။ Error ဖြစ်ခဲ့ရင်တော့ https://dev.mysql.com/downloads/connector/python/ မှာ python connector ကို download ချနိုင်ပါတယ်။
MySQL Connectivity
အခု ကျွန်တော်တို့တွေ sampleProj ဆိုပြီး folder ဆောက်လိုက်ပါမယ်။ sampleProj အောက်မှာ test.py ဆိုပြီး folder အောက်မှာ ဆောက် ဖို့ လိုပါတယ်။
test.py
import mysql.connector

mydb = mysql.connector.connect(
  host="localhost",
  user="root",
  password="root",
  database="myschool"
)

print(mydb)
ကျွန်တော်ကတော့ database ကို username root နဲ့ password root လို့ ပေးထားလို့ပါ။ လက်ရှိ ကိုယ်သုံးနေသည့် root password ကို ထည့်ပြီးတော့ စမ်းကြည့်ပါ။ database ကတော့ myschool ကို အသုံးပြုထားပါတယ်။
$python3 test.py
ဆိုရင်
<mysql.connector.connection_cext.CMySQLConnection object at 0x7fe64be60640>
SELECT Data
အခု test.py မှာ ဆက်ပြီးတော့ database ဆောက်သည့် code ရေးကြည့်ရအောင်။
import mysql.connector

mydb = mysql.connector.connect(
  host="localhost",
  user="root",
  password="root",
  database="myschool"
)

mycursor = mydb.cursor()
mycursor.execute("SELECT * FROM students")

myresult = mycursor.fetchall()

mycursor.close()
mydb.close()

for x in myresult:
  print(x)
အဲဒီ code ကို run လိုက်ရင်
(1, 'Mg Mg', 'CS_101', datetime.datetime(2020, 10, 14, 0, 14, 6))
(2, 'Aung Gyi', 'CS_101', datetime.datetime(2020, 10, 14, 0, 14, 6))
(3, 'Yang Aung', 'CS_101', datetime.datetime(2020, 10, 14, 0, 14, 6))
(4, 'Kyaw Kyaw', 'CS_102', datetime.datetime(2020, 10, 14, 0, 14, 6))
(5, 'Moe Moe', 'CS_102', datetime.datetime(2020, 10, 14, 0, 14, 6))
(6, 'Zu Zu', None, datetime.datetime(2020, 10, 14, 0, 14, 6))
(7, 'Gone Tint', None, datetime.datetime(2020, 10, 14, 0, 14, 6))
(8, 'Kyaw Myint', None, datetime.datetime(2020, 10, 14, 0, 27, 43))
(9, 'Moe Aung', None, datetime.datetime(2020, 10, 14, 0, 27, 43))
ဆိုပြီး ထွက်လာပါမယ်။
mycursor.fetchall() က SELECT * FROM students query က ရလာသည့် result တွေ အကုန် ဆွဲထုတ်လိုက်တာပါ။
အကယ်၍ အပေါ် ဆုံး တစ်ခုပဲ ထုတ်ချင်ရင်တော့ mycursor.fetchone() ကို သုံးနိုင်ပါတယ်။
myresult = mycursor.fetchone()
print(myresult)
mycursor.close()
mydb.close()
mysql ကို သုံးသည့် အခါမှာ လိုအပ်သည့် data တွေ ရပြီးပါက connection ကို ပြန်ပိတ်သင့်ပါတယ်။ သို့မှသာ memory resource အသုံးပြုတာတွေ သက်သာ ပါလိမ့်မယ်။ ပုံမှန် project အသေးလေးတွေ မှာ မသိသာ ပေမယ့် project ကြီးလာရင် သိသာပါလိမ့်မယ်။
အခု Where နဲ့ စစ်ကြည့်ရအောင်။
import mysql.connector

mydb = mysql.connector.connect(
  host="localhost",
  user="root",
  password="root",
  database="myschool"
)

mycursor = mydb.cursor()
mycursor.execute("SELECT name,dep_code FROM students WHERE name like '%Aung%'")

myresult = mycursor.fetchall()

mycursor.close()
mydb.close()

for res in myresult:
  print("NAME : " ,res[0])
  print("DEP Code : " ,res[1])
  print("---")
students table ထဲ က name မှာ Aung ပါသည့် ကျောင်းသားတွေကို ဆွဲ ထုတ်တာပါ။ code ကို run လိုက်ရင် database ထဲမှာ ရှိသည့် data တွေကို ထုတ်ပြပါလိမ့်မယ်။
NAME :  Aung Gyi
DEP Code :  CS_101
---
NAME :  Moe Aung
DEP Code :  None
---
NAME :  Yang Aung
DEP Code :  CS_101
---
code ကို အနည်းငယ် ပြင်ပါမယ်။
import mysql.connector

mydb = mysql.connector.connect(
  host="localhost",
  user="root",
  password="root",
  database="myschool"
)

mycursor = mydb.cursor()
mycursor.execute("SELECT name,dep_code FROM students WHERE name like %s",("%Aung%",))

myresult = mycursor.fetchall()

mycursor.close()
mydb.close()

for res in myresult:
  print("NAME : " ,res[0])
  print("DEP Code : " ,res[1])
  print("---")
အခု code မှာ ဆိုရင် Aung ကို sql ထဲမှာ တိုက်ရိုက် မသုံးတော့ပဲ %s နဲ့ parameter pass လုပ်ထားပါတယ်။ execute လုပ်ချိန်မှာ parameter ကို tuple နဲ့ ထည့်ပေးရပါမယ်။
အခု id နဲ့ ထပ်ပြီးတော့ ထုတ်ကြည့်ရအောင်။
import mysql.connector

mydb = mysql.connector.connect(
  host="localhost",
  user="root",
  password="root",
  database="myschool"
)

mycursor = mydb.cursor()
mycursor.execute("SELECT name,dep_code FROM students WHERE student_id = %s",("9",))

myresult = mycursor.fetchall()

mycursor.close()
mydb.close()

for res in myresult:
  print("NAME : " ,res[0])
  print("DEP Code : " ,res[1])
  print("---")
အခု ဆိုရင် student_id 9 ဖြစ်သည့် ကျောင်းသား တစ်ယောက်တာ ထွက်လာပါလိမ့်မယ်။
parameter pass လုပ်ခြင်းဟာ sql injection ကို ကာကွယ်ပြီး သား ဖြစ်ပါတယ်။ parameter pass မလုပ်ပဲ တိုက်ရိုက် သုံးခြင်းဟာ အန္တရာယ်များပြီး sql injection ပြုလုပ်လို့ ရစေနိုင်ပါတယ်။
INSERT Data
အခု INSERT အတွက် ရေးကြည့်ရအောင်။
import mysql.connector

mydb = mysql.connector.connect(
  host="localhost",
  user="root",
  password="root",
  database="myschool"
)

mycursor = mydb.cursor()

sql = "INSERT INTO students (name, dep_code) VALUES (%s, %s)"
val = ("John", "CS_102")
mycursor.execute(sql, val)

mydb.commit()

print(mycursor.rowcount, "record inserted.")

mycursor.close()
mydb.close()
INSERT ပြုလုပ်သည့် အခါမှာတော့ value တွေကို execute ပြုလုပ်သည့် အခါမှာ tuple နဲ့ ပဲ pass လုပ်ထားပါတယ်။
code ကို run လိုက်ရင် students table မှာ John, CS_102 အနေဖြင့် ထည့်လိုက်ခြင်း ဖြစ်သည်။ 1 record inserted. ဆိုပြီး ပြပါမယ်။
အကယ်၍ multiple row insert ပြုလုပ်လိုပါက အောက်ပါ အတိုင်း ပြုလုပ်နိုင်ပါတယ်။
import mysql.connector

mydb = mysql.connector.connect(
  host="localhost",
  user="root",
  password="root",
  database="myschool"
)

mycursor = mydb.cursor()

sql = "INSERT INTO students (name, dep_code) VALUES (%s, %s)"
val = [
    ("Joe", "CS_102"),
    ("Set", "CS_101"),
    ("Mona", "CS_102"),
    ("Lisa", "CS_101")
]
mycursor.executemany(sql, val)

mydb.commit()

print(mycursor.rowcount, "record inserted.")

mycursor.close()
mydb.close()
execute အစား executemany ကို သုံးထားတာကို တွေ့ရပါလိမ့်မယ်။ Value တွေကိုတော့ array ထဲမှာ ထည့်ပြီး တော့ executemany row ၄ ခု ကို ထည့်သွားပါတယ်။
code ကို run လိုက်ရင် 4 record inserted. ဆိုပြီး တွေ့နိုင်ပါတယ်။
UPDATE Data
INSERT ပြုလုပ်ပြီးပြီ ဆိုတော့ update လုပ်ကြည့်ရအောင်။
import mysql.connector

mydb = mysql.connector.connect(
  host="localhost",
  user="root",
  password="root",
  database="myschool"
)

mycursor = mydb.cursor()
mycursor.execute("UPDATE students SET name = %s WHERE student_id = %s",("Ko Oo","9"))

mydb.commit()

print(mycursor.rowcount, "record updated.")

mycursor.close()
mydb.close()
အခု code ဟာ student_id ဟာ 9 ဖြစ်သည့် name ကို Ko Oo ဆိုပြီး update လုပ်လိုက်ခြင်း ဖြစ်ပါတယ်။
DELETE Data
DELETE ကလည်း INSERT လိုမျိုး execute , commit လုပ်ရုံပါပဲ။
import mysql.connector

mydb = mysql.connector.connect(
  host="localhost",
  user="root",
  password="root",
  database="myschool"
)

mycursor = mydb.cursor()
mycursor.execute("DELETE FROM students WHERE student_id = %s",("9",))

mydb.commit()

print(mycursor.rowcount, "record deleted.")

mycursor.close()
mydb.close()
အခု code လေးကို run လိုက်ရင် student_id ဟာ 9 ဖြစ်သည့် row ကို ဖျက်လိုက်မှာ ဖြစ်ပါတယ်။
အခု code တွေကို ပြန်ပြီး ကြည့်လိုက်ရင် data ဆွဲထုတ်မယ်ဆိုရင် execute , fetchall ကို သုံးပြီး data တွေကို ထည့်မယ် ၊ ဖျက်မယ် ၊ ပြင်မယ် ဆိုရင် execute , commit လုပ်ရုံပါပဲ။
နိဂုံးချုပ်
ပထမဆုံး စာအုပ်ကို ပြီးအောင် ဖတ်သည့် အတွက် ကျေးဇူးတင်ပါတယ်။ စာအုပ်တစ်အုပ် ဖတ်ဖို့ မလွယ်ကူလှ သလို ဖတ်ပြီးရင်လည်း ပြီးအောင် ဖတ်ဖို့ မလွယ်လှပါဘူး။ စာမျက်နှာ ၁၀၀ ထိပဲ မှန်းခဲ့ပေမယ့် စာမျက်နှာ ၁၄၀ လောက် ဖြစ်သွားပါတယ်။
ဒီစာအုပ်မှာ database နဲ့ ပတ်သက်ပြီး ပြည့်ပြည့်စုံစုံ မထည့်ထားဘူး အခြေခံ အဆင့် ကို သာ ထည့်ရေးသား ထားပါတယ်။ Database နဲ့ ပတ်သက်ရင် လေ့လာစရာတွေ အများကြီးပါ။ ERD diagram ကို အသေးစိတ် မရှင်းပြထားပါဘူး ။ စာအုပ်ကို အခြေခံ အကျဆုံး နဲ့ အများကြီး မထည့်ပဲ လိုအပ်ပြီး နားလည် လွယ်အောင် ကြိုးစားပြီး ရေးသားထားပါတယ်။
Database ဆိုသည့် အခါမှာ basic ပိုင်းက လွယ်ပေမယ့် ထပ်ပြီး လေ့လာဖို့ တွေ အများကြီး ရှိပါသေးတယ်။ Database နဲ့ ပတ်သက်ပြီး Database Administrator (DBA) ဆိုသည့် အလုပ် position ဆိုတာ ရှိပါတယ်။ Database ကို design, migration, performance monitoring စသည်ဖြင့် database နဲ့ ပတ်သက်တာတွေကို ကိုယ်တွယ် ရသည့် အပိုင်းပါ။ Database ဟာ system တစ်ခု မှာ အရေးကြီးပါတယ်။ ပုံမှန် programmer တစ်ယောက်ဟာ sql တွေ ရေးကောင်းရေးတတ် ပေမယ့် DBA လောက်တော့ database design ကောင်းအောင်, performance ကောင်းအောင် မဖန်တီး နိုင်ပါဘူး။
ကျောင်း project တွေမှာ row ၁ သောင်းလောက် ကို များပြီ လို့ ထင်ကောင်း ထင်ပါလိမ့်မယ်။ လက်တွေ့ အလုပ်လုပ်သည့် အချိန်မှာတော့ row တွေဟာ millions နဲ့ ချီပြီး အလုပ်လုပ်ရ သည့် အပိုင်းတွေ အများကြီး ရှိပါတယ်။ database ကို မြန်ဆန် အောင် ကောင်းမွန် သည့် design ဖြစ်အောင် basic ကနေ ဆက်ပြီး Trigger, Stored procedure တွေကို ဆက်ပြီး လေ့လာဖို့ တိုက်တွန်း လိုပါတယ်။
ထိန်လင်းရွှေ @ Saturngod
၂၇ ရက် အောက်တိုဘာ ၂၀၂၀
မနက် ၂ နာရီ ၃၉ မိနစ်
Reference
- https://dev.mysql.com/doc/refman/8.0/en/
- https://www.studytonight.com/dbms/database-normalization.php
- https://www.tutorialspoint.com/mysql/mysql-useful-functions.htm
- https://www.techonthenet.com/mysql/
- https://www.vertabelo.com/blog/everything-you-need-to-know-about-mysql-partitions/
- https://www.visual-paradigm.com/guide/data-modeling/what-is-entity-relationship-diagram/